
SVFR Face Restoration: Enhancing Video Quality, Colorizing Black & White Footage, and Removing Watermarks

Table Of Content
- What is SVFR Face Restoration?
- Why SVFR is Special
- SVFR Face Restoration Overview:
- How SVFR Face Restoration Works?
- 1. **Task Embedding Component**
- 2. **Unified Latent Regularization Component**
- 3. **Facial Prior Learning**
- Comparing SVFR to Other Tools
- Getting Started with SVFR
- 1. **Downloading and Running SVFR Locally**
- 2. **System Requirements**
- Setting Up SVFR
- Step 1: Install a Conda Environment
- Step 2: Install PyTorch
- Step 3: Install Dependencies
- Step 4: Download Checkpoints
- Running SVFR
- 1. **Inference for Single or Multiple Tasks**
- 2. **Inference with Inpainting Mask**
- 3. **Running the Gradio Demo**
- How to use SVFR Face Restoration on HuggingFace?
- Example Workflow:
- Conclusion
In this article, I’ll walk you through the capabilities of SVFR (Stable Video Face Restoration), a powerful tool designed to enhance video quality, colorize black-and-white footage, and remove watermarks.
SVFR is an integrated system that performs multiple tasks efficiently. Let’s get into its features, how it works, and how you can get started with it.
What is SVFR Face Restoration?
SVFR stands for Stable Video Face Restoration.
It’s a tool that can enhance videos in several ways:
-
Enhancing Low-Quality or Blurry Faces: SVFR can make blurry or low-quality faces appear clearer in videos. For example, in the examples shown, the input videos are extremely blurry, but SVFR upscales and sharpens the faces effectively.
-
Colorizing Black-and-White Videos: SVFR can add color to black-and-white footage. It accurately colorizes faces, bringing old videos to life.
-
Removing Watermarks and Subtitles: SVFR can erase unwanted elements like watermarks or subtitles from videos. For instance, if there’s a watermark in the top corner or subtitles at the bottom, SVFR can remove them and fill in the missing areas seamlessly.
Why SVFR is Special
What sets SVFR apart is its ability to perform all these tasks under one system. Previously, each task—such as colorization, inpainting (filling in missing areas), or enhancing facial details—had to be done separately. SVFR combines these tasks into a single, efficient workflow, saving time and effort.
SVFR Face Restoration Overview:
| Detail | Description |
|---|---|
| Name | SVFR - Stable Video Face Restoration |
| Purpose | AI-powered video face restoration, colorization and watermark removal |
| Paper | arxiv.org/pdf/2501.01235 |
| GitHub Repository | github.com/wangzhiyaoo/SVFR |
| Project Page | wangzhiyaoo.github.io/SVFR/ |
| HuggingFace Demo | huggingface.co/spaces/fffiloni/SVFR-demo |
How SVFR Face Restoration Works?
SVFR is trained using a unique architecture that allows it to handle multiple tasks effectively. Here’s a breakdown of its training process:
1. Task Embedding Component
This component teaches the model what task it needs to perform, such as inpainting, colorization, or enhancing facial details.
2. Unified Latent Regularization Component
This part of the system combines features from different tasks to improve overall performance. By sharing features across tasks, SVFR becomes more effective at handling each one.
3. Facial Prior Learning
This component detects facial features in videos, ensuring that the restoration process focuses on the most important aspects of the face.
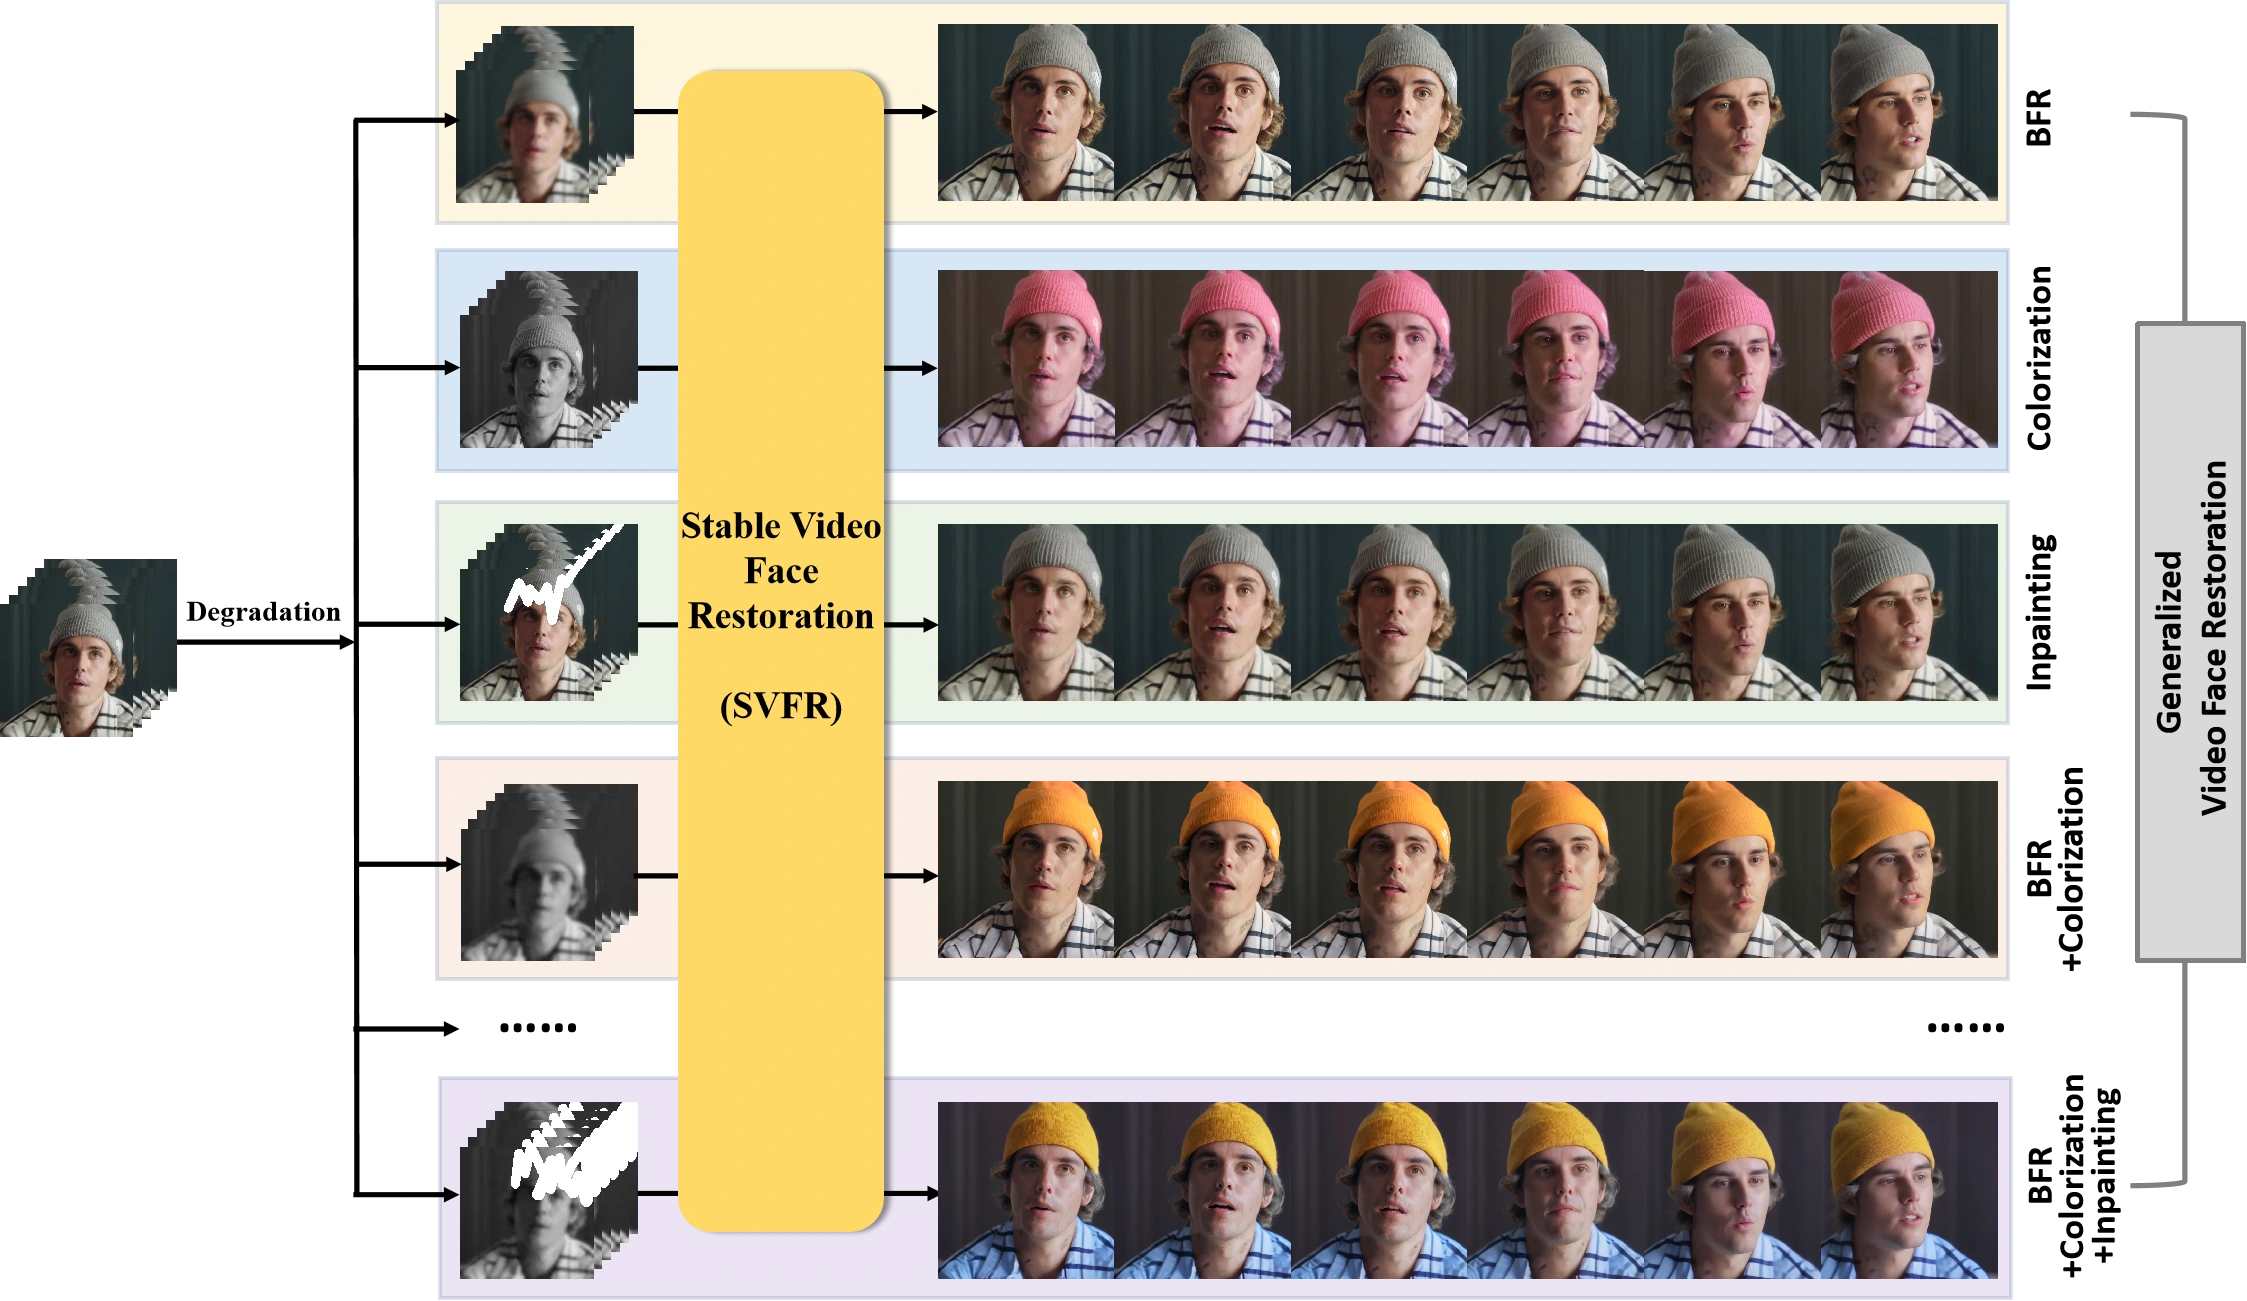
By training the AI through this architecture, SVFR can enhance or restore faces, colorize videos, and inpaint missing areas—all within one integrated system.
Comparing SVFR to Other Tools
When compared to existing tools, SVFR stands out as the most consistent and accurate. For example:
- Consistency: Other methods often produce warped or inconsistent results, while SVFR delivers sharp and accurate outputs.
- Handling Tricky Angles: In one example, other methods struggled with a tricky angle, causing the subject’s right eye to appear distorted. SVFR, however, handled the angle perfectly.
- Colorization: In colorization comparisons, SVFR produces the most realistic results, making it the top choice for this task.
- Inpainting: When filling in missing areas, other methods struggle to maintain video consistency, while SVFR excels at this task.
Getting Started with SVFR
Here’s how you can get started:
1. Downloading and Running SVFR Locally
You can download SVFR and run it on your computer. The repository contains all the instructions you need to set it up. If you don’t have a powerful GPU, you can also use the free Hugging Face space to run SVFR online.
2. System Requirements
It’s recommended to use a GPU with 16GB or more VRAM for optimal performance.
Setting Up SVFR
Here’s a step-by-step guide to setting up SVFR on your computer:
Step 1: Install a Conda Environment
Use the following commands to create and activate a conda environment for SVFR:
conda create -n svfr python=3.9 -y
conda activate svfr
Step 2: Install PyTorch
Install PyTorch, making sure to select the appropriate CUDA version for your hardware. For example:
pip install torch==2.2.2 torchvision==0.17.2 torchaudio==2.2.2Step 3: Install Dependencies
Install the required dependencies using the following command:
pip install -r requirements.txtStep 4: Download Checkpoints
Download the necessary checkpoints for SVFR:
conda install git-lfs
git lfs install
git clone https://huggingface.co/stabilityai/stable-video-diffusion-img2vid-xt models/stable-video-diffusion-img2vid-xt
You can also download checkpoints manually from the provided Google Drive link. Place the checkpoints in the following directory structure:
└── models
    ├── face_align
    │   ├── yoloface_v5m.pt
    ├── face_restoration
    │   ├── unet.pth
    │   ├── id_linear.pth
    │   ├── insightface_glint360k.pth
    └── stable-video-diffusion-img2vid-xt
        ├── vae
        ├── scheduler
        └── ...
Running SVFR
Once you’ve set up SVFR, you can start using it to enhance your videos. Here’s how:
1. Inference for Single or Multiple Tasks
Use the following command to run SVFR for specific tasks:
python3 infer.py \
 --config config/infer.yaml \
 --task_ids 0 \
 --input_path ./assert/lq/lq1.mp4 \
 --output_dir ./results/ \
--crop_face_region-
Task IDs:
0: Face restoration (BFR)1: Colorization2: Inpainting0,1: Face restoration and colorization0,1,2: Face restoration, colorization, and inpainting
-
Crop Face Region: Use the
--crop_face_regionflag to focus on the facial area for better results.
2. Inference with Inpainting Mask
If you need to specify a mask file for inpainting, use the following command:
python3 infer.py \
 --config config/infer.yaml \
 --task_ids 0,1,2 \
 --input_path ./assert/lq/lq3.mp4 \
 --output_dir ./results/ \
 --mask_path ./assert/mask/lq3.png \
 --crop_face_region
3. Running the Gradio Demo
You can also run a web demo locally. First, install Gradio:
pip install gradioThen, run the demo:
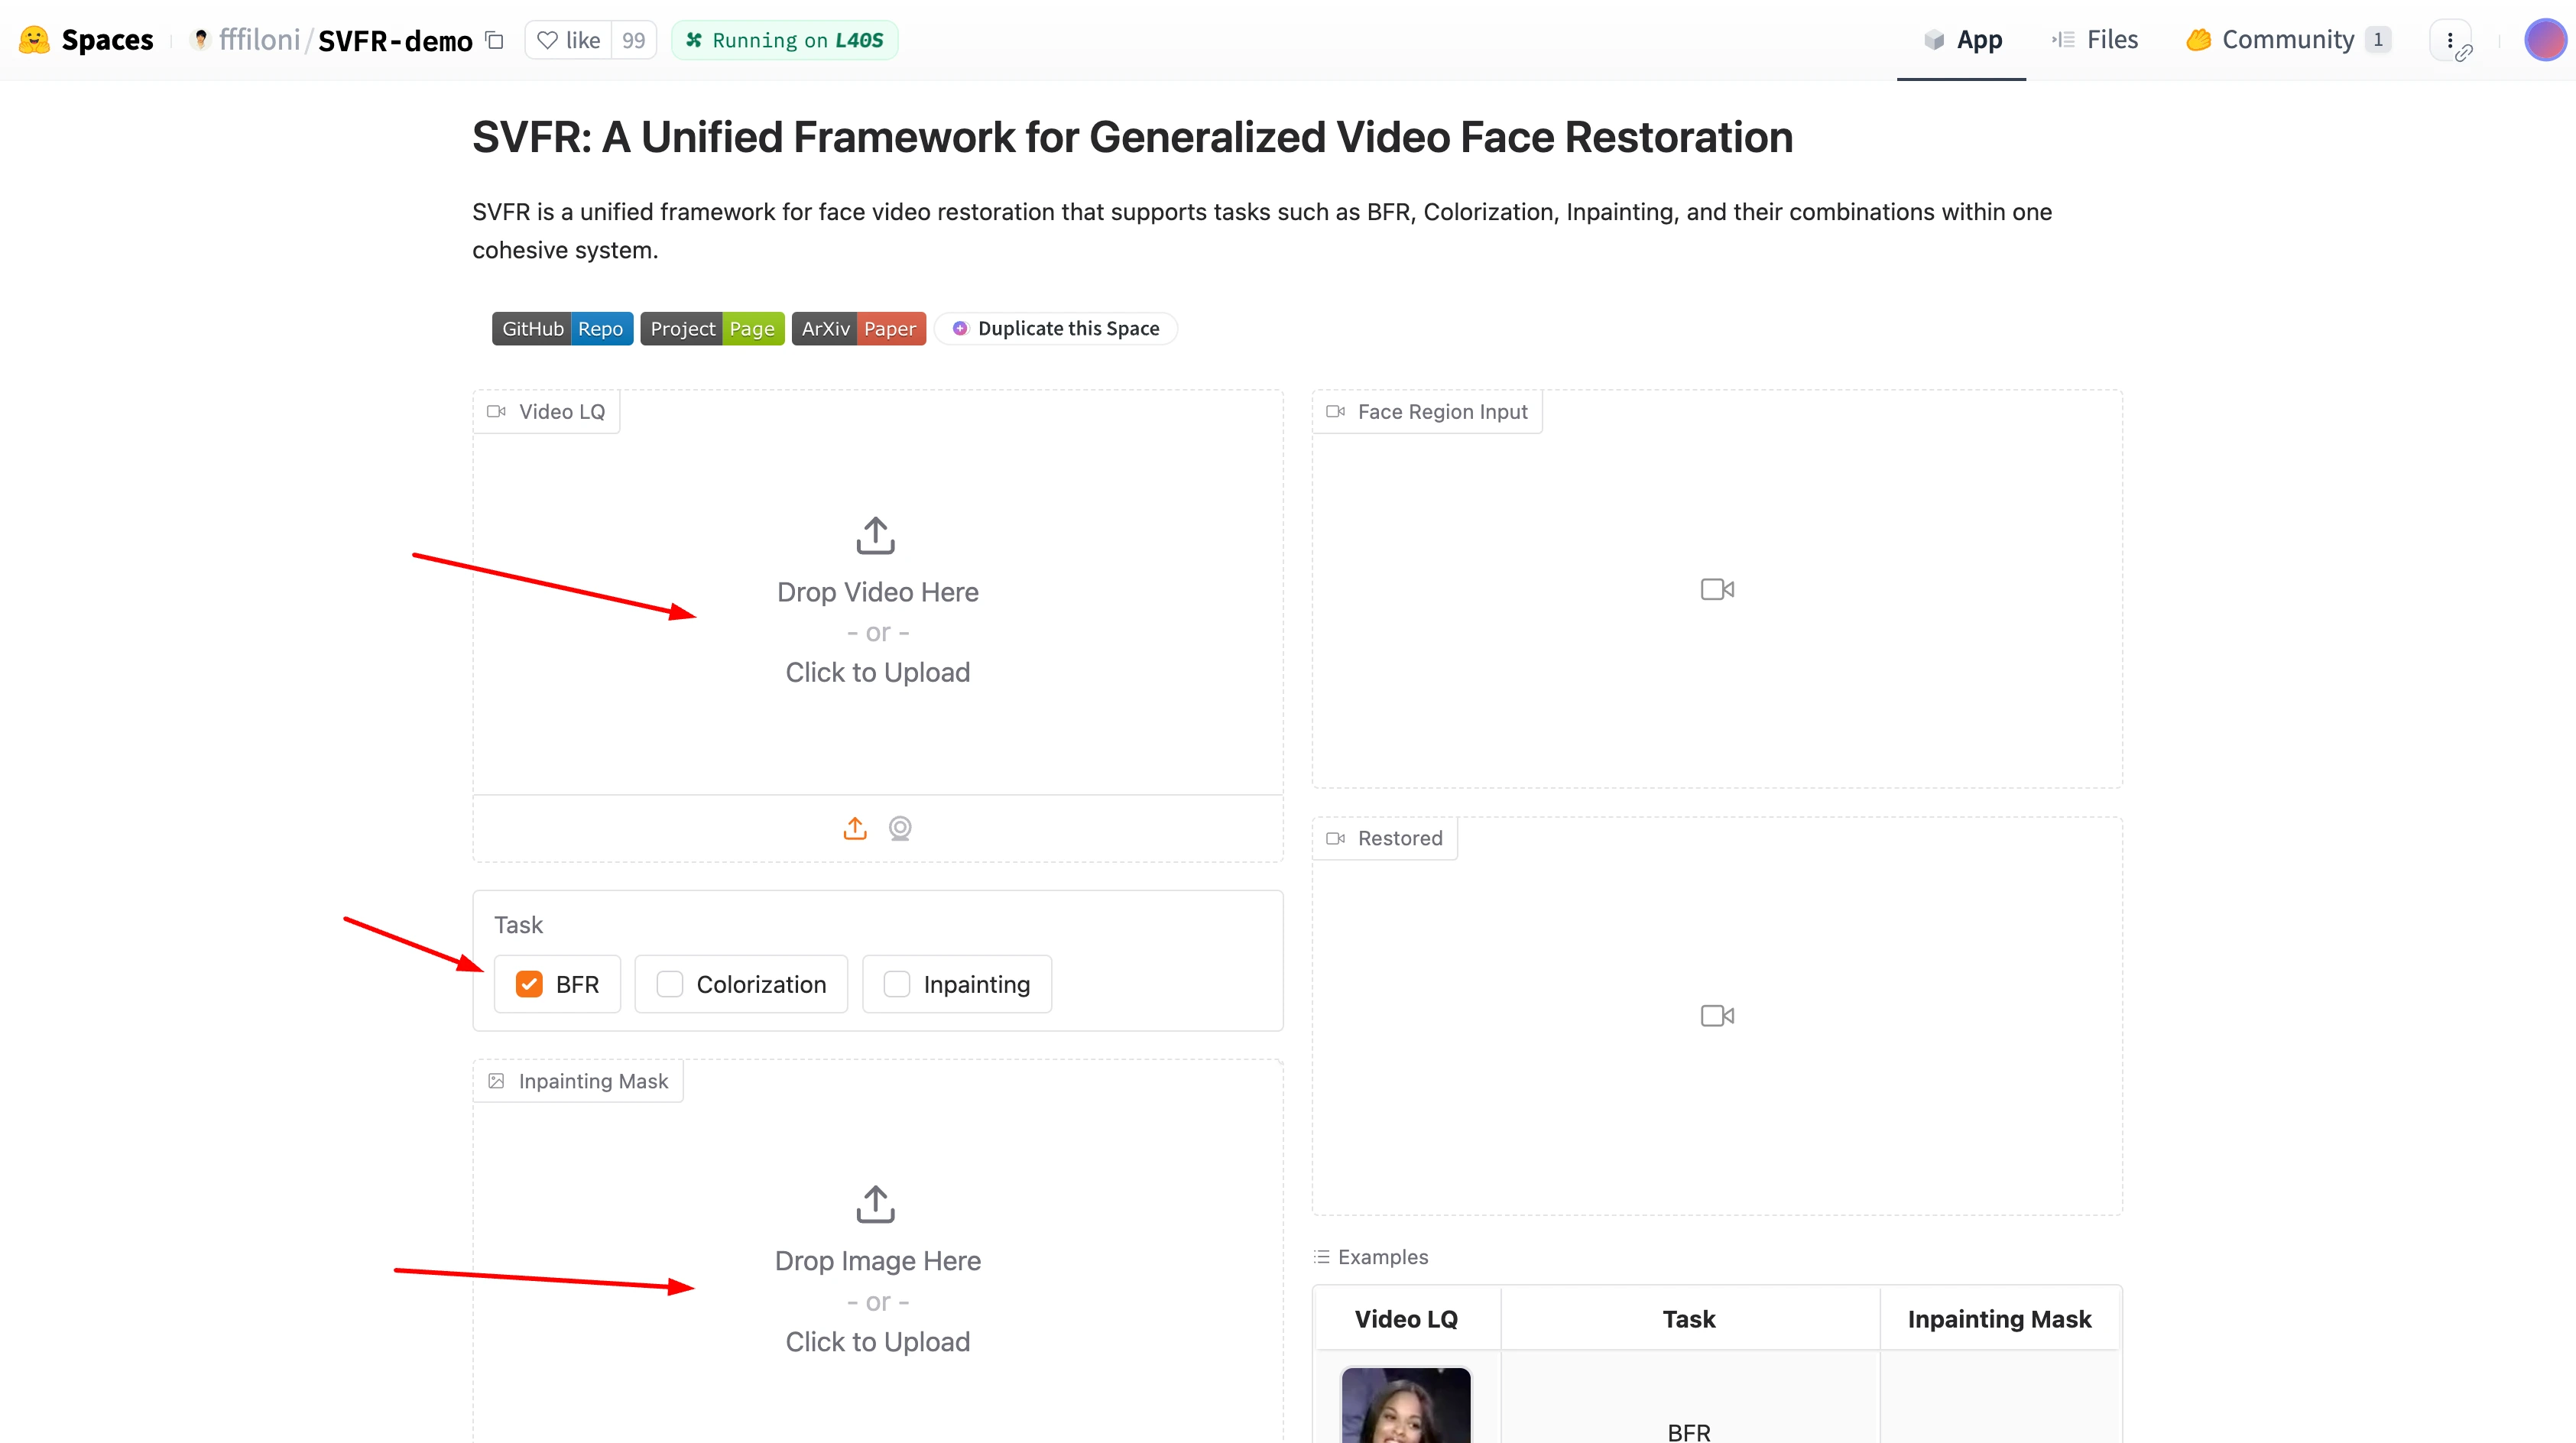
python3 demo.pyHow to use SVFR Face Restoration on HuggingFace?
-
Upload Video:
- Drag and drop your low-quality (LQ) video file into the designated area or click to upload.
- Supported formats: Common video formats like MP4, AVI, etc.
-
Select Task:
- Choose the restoration task(s) you want to perform:
- BFR: For enhancing face details.
- Colorization: For adding color to grayscale videos.
- Inpainting: For repairing damaged or missing parts of the video.
- Inpainting Mask: If you select Inpainting, you may need to upload a mask image indicating the areas to be inpainted.
- Choose the restoration task(s) you want to perform:
-
Upload Mask (if applicable):
- If you choose Inpainting, drag and drop or upload an image mask that highlights the regions to be restored.
-
Set Seed (Optional):
- You can set a random seed (e.g., 77) for reproducibility or click the dice icon to generate a random seed.
-
Submit:
- Click the "Submit" button to start the restoration process.
-
Clear:
- Use the "Clear" button to reset the inputs and start over.
-
Face Region Input (Optional):
- If needed, you can specify the face region in the video for more targeted restoration.
-
Restored Output:
- Once the process is complete, the restored video will be displayed or made available for download.
Example Workflow:
- Task: BFR + Colorization
- Input: Upload a low-quality grayscale face video.
- Output: The system restores the face details and adds color, resulting in a high-quality, colorized face video.
Conclusion
SVFR is a powerful and versatile tool for video restoration. If you’re looking to enhance blurry faces, colorize black-and-white footage, or remove watermarks, SVFR can handle it all in one system. Its ability to perform multiple tasks efficiently makes it a standout choice for video restoration.
With the setup instructions provided, you can start using SVFR to bring your videos to life.
If you’re interested in exploring SVFR further, check out the repository and try it out for yourself.
Related Posts

3DTrajMaster: A Step-by-Step Guide to Video Motion Control
Browser Use is an AI-powered browser automation framework that lets AI agents control your browser to automate web tasks like scraping, form filling, and website interactions.

Caracal AI: Free Tool for Handwritten Text Recognition, Extract text from Images
Caracal is a text recognition project that has been widely cloned and fine-tuned by users for specific purposes. The project leverages advanced technology for text recognition tasks, as highlighted in the provided transcript snippet.

Browser-Use Free AI Agent: Now AI Can control your Web Browser
Browser Use is an AI-powered browser automation framework that lets AI agents control your browser to automate web tasks like scraping, form filling, and website interactions.