
STAR: AI-Powered Video Super-Resolution for Sharper, High-Quality Upscaling

Table Of Content
- What is STAR?
- STAR Overview:
- Key Features of STAR
- Examples of STAR in Action
- Example 1: Cheetahs in Motion
- Example 2: AI-Generated Video
- Example 3: Human Subject
- Example 4: Panda Playing Guitar
- How STAR Compares to Other Upscalers
- Benchmark Metrics
- Visual Comparisons
- How to use STAR on Google Colab?
- **Step 1: Set Up Google Colab**
- **Step 2: Clone the STAR Repository**
- **Step 3: Install Dependencies**
- **Step 4: Set Up Pretrained Weights**
- **Step 5: Modify the Script (if needed)**
- **Step 6: Run Inference**
- **Step 7: View Results**
- **Optional: Customize the Process**
- How STAR Works?
- 1. VAE Encoders
- 2. Text Encoder
- 3. ControlNet
- 4. Local Information Enhancement Module (LIEM)
- Why STAR Stands Out?
- Key Innovations
- How to Use STAR
- Final Thoughts
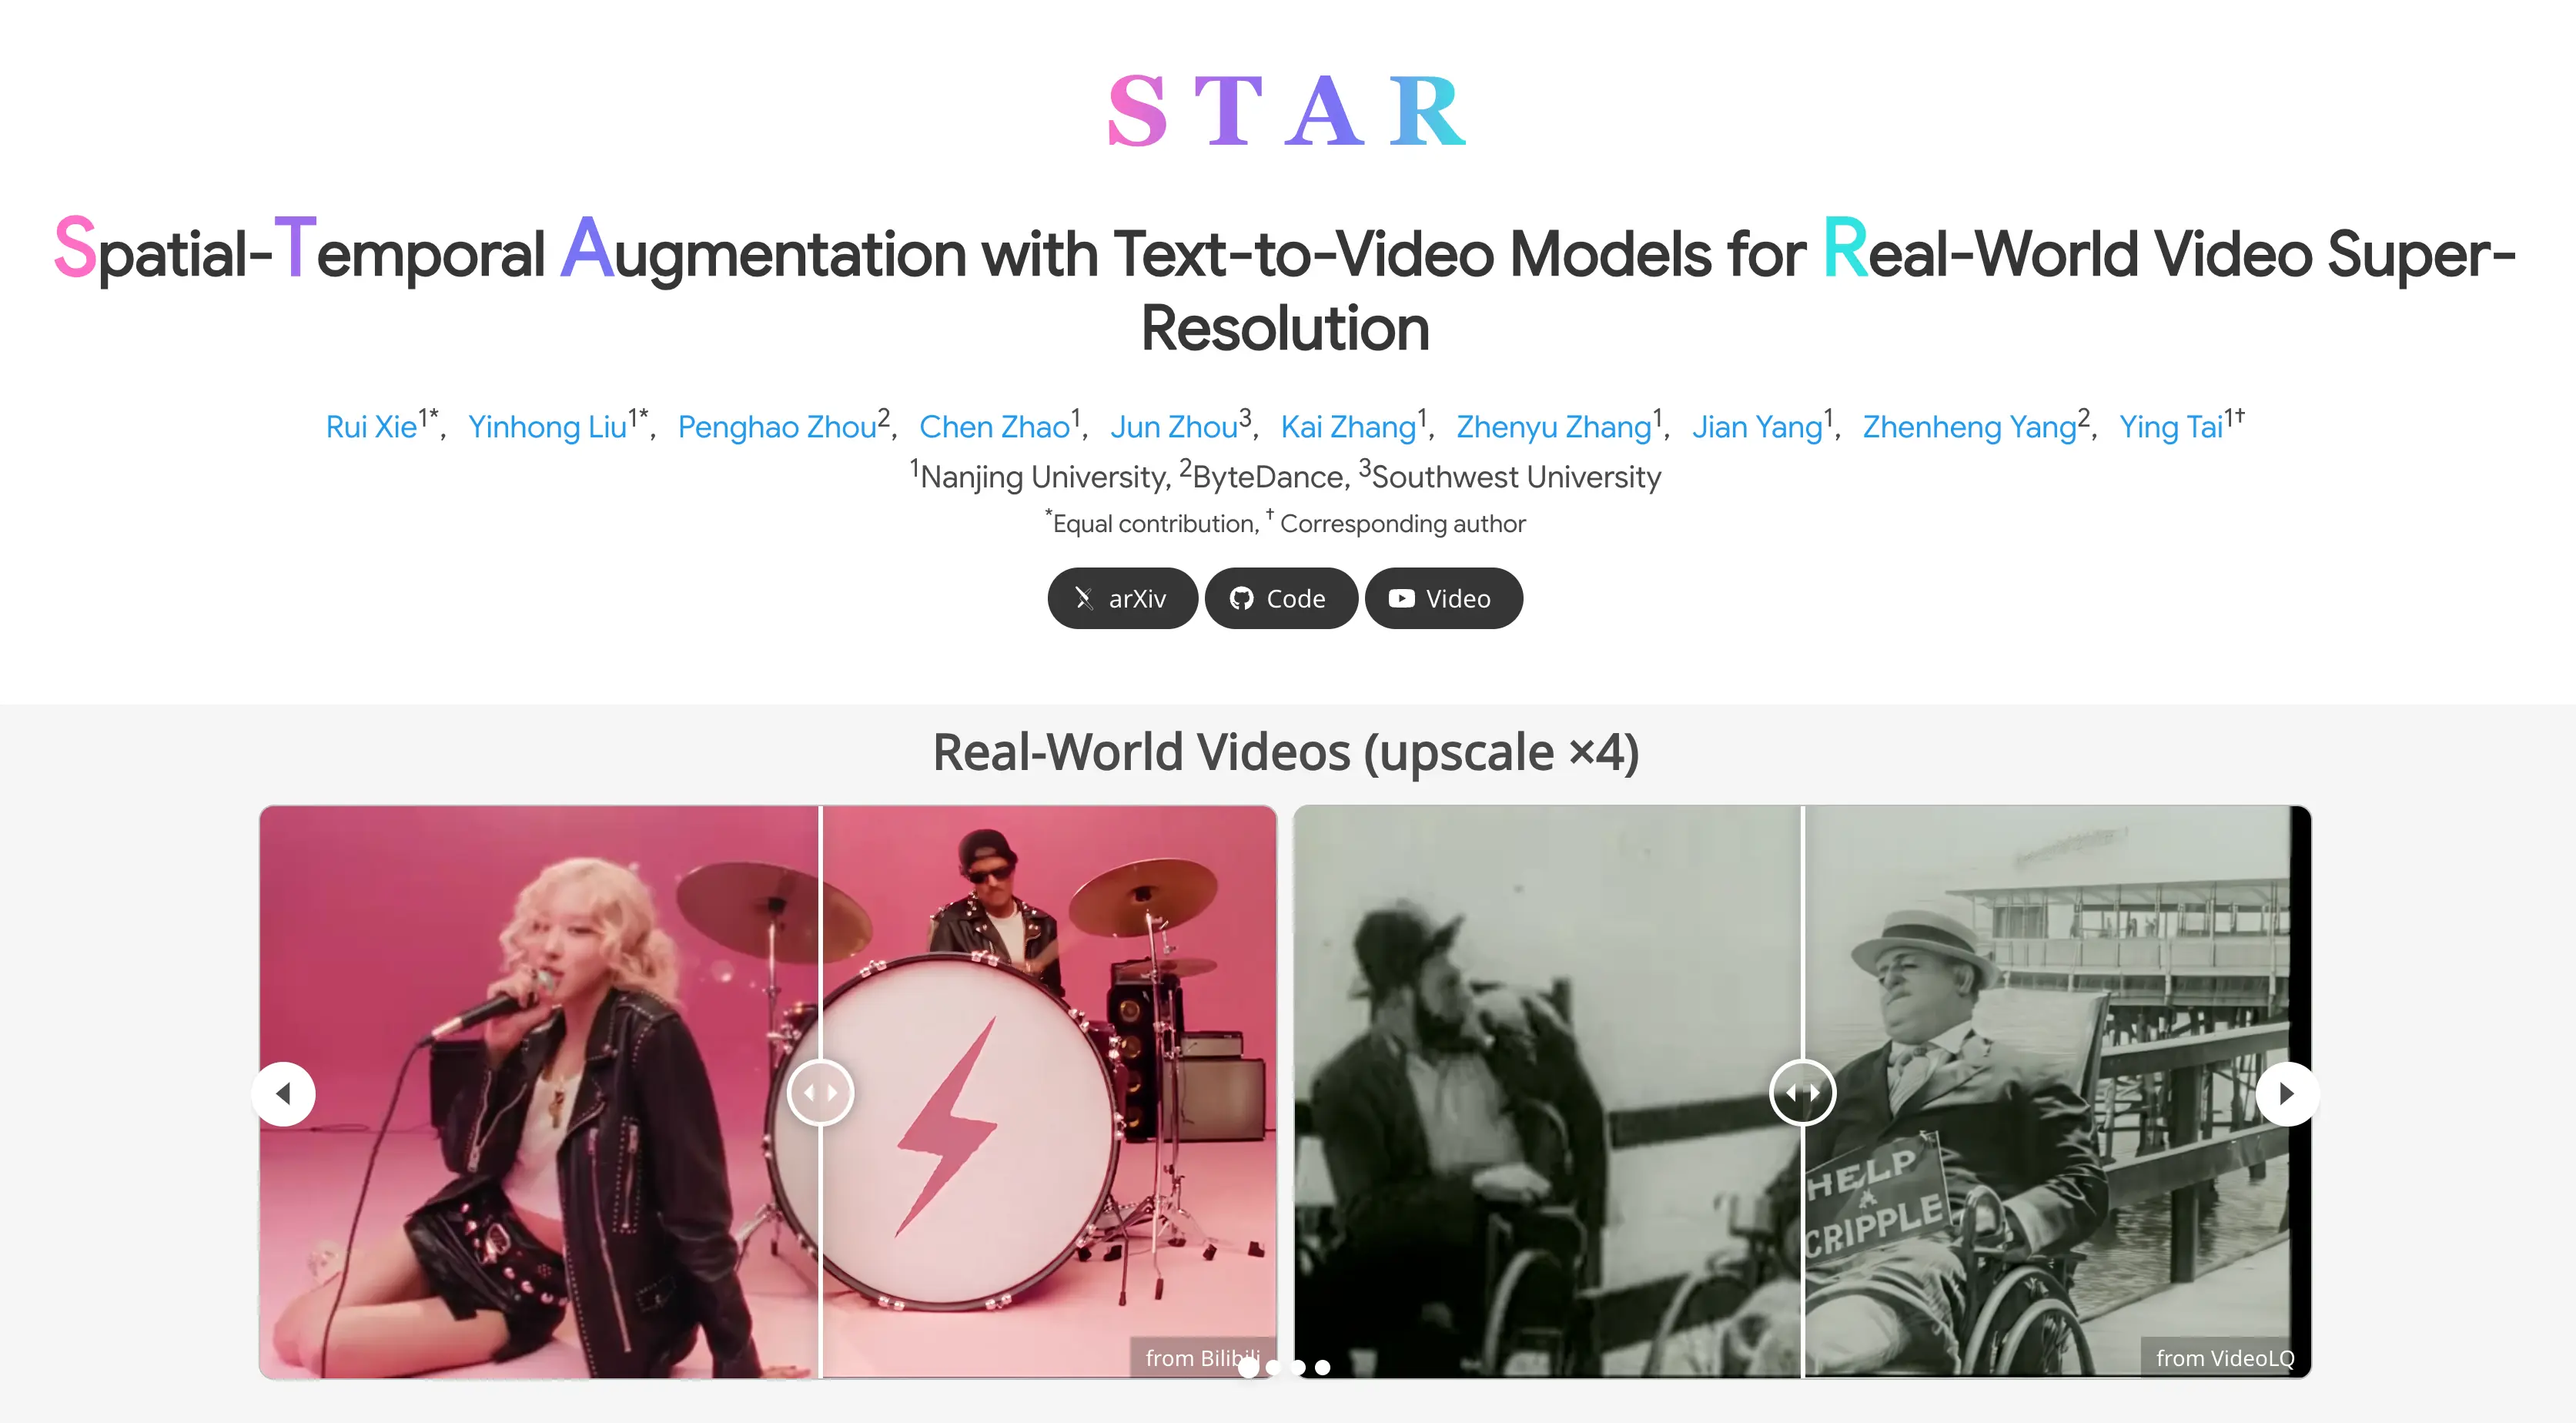
In this article, I’ll walk you through STAR (Spatial-Temporal Augmentation with Text-to-Video Models for Real-World Video Super-Resolution), an open-source AI tool that can upscale videos by up to 4X. This technology allows you to take blurry videos and make them significantly sharper and more detailed.
Let’s explore how it works, its capabilities, and why it stands out compared to other video upscaling tools.
What is STAR?
STAR is knows as Spatial-Temporal Augmentation with Text-to-Video Models for Real-World Video Super-Resolution.
STAR is an AI-powered video super-resolution tool designed to enhance the quality of videos by upscaling them up to four times their original resolution. It uses a combination of spatial-temporal augmentation and text-to-video models to achieve realistic and sharp results.
STAR Overview:
| Detail | Description |
|---|---|
| Name | STAR - Spatial-Temporal Augmentation with Text-to-Video Models |
| Purpose | AI-powered video super-resolution for up to 4X upscaling |
| Paper | STAR Paper on arXiv |
| GitHub Repository | STAR GitHub Code |
| Project Page | STAR Project Page |
| HuggingFace Demo | Try STAR on Hugging Face |
| Video Demo | Watch STAR in Action |
| Google Colab | Try STAR in Colab |
Key Features of STAR
- Upscales videos by up to 4X.
- Works on both real-world and AI-generated videos.
- Enhances details like skin texture, hair, and fur.
- Maintains temporal consistency, reducing artifacts and deformities.
Examples of STAR in Action
Let’s take a look at some examples to see how STAR transforms blurry videos into sharper, high-quality ones.
Example 1: Cheetahs in Motion
- Before: A blurry video of two cheetahs running.
- After: The video becomes significantly sharper, with clear details of the cheetahs’ fur and movements.
Before: Low Quality
After: Enhanced by STAR
Example 2: AI-Generated Video
- Before: A video generated using AI tools like CLIP.
- After: STAR enhances the video, making it sharper and more detailed.
Example 3: Human Subject
- Before: A blurry video of a person.
- After: Notice the improved details in the skin and hair, which become much more defined.
Example 4: Panda Playing Guitar
- Before: A blurry video of a panda playing a guitar.
- After: The panda’s fur and the guitar strings are much sharper and more detailed.
Before: Low Quality
After: Enhanced by STAR
How STAR Compares to Other Upscalers
When compared to other video upscaling tools, STAR consistently outperforms them in terms of video quality and accuracy.
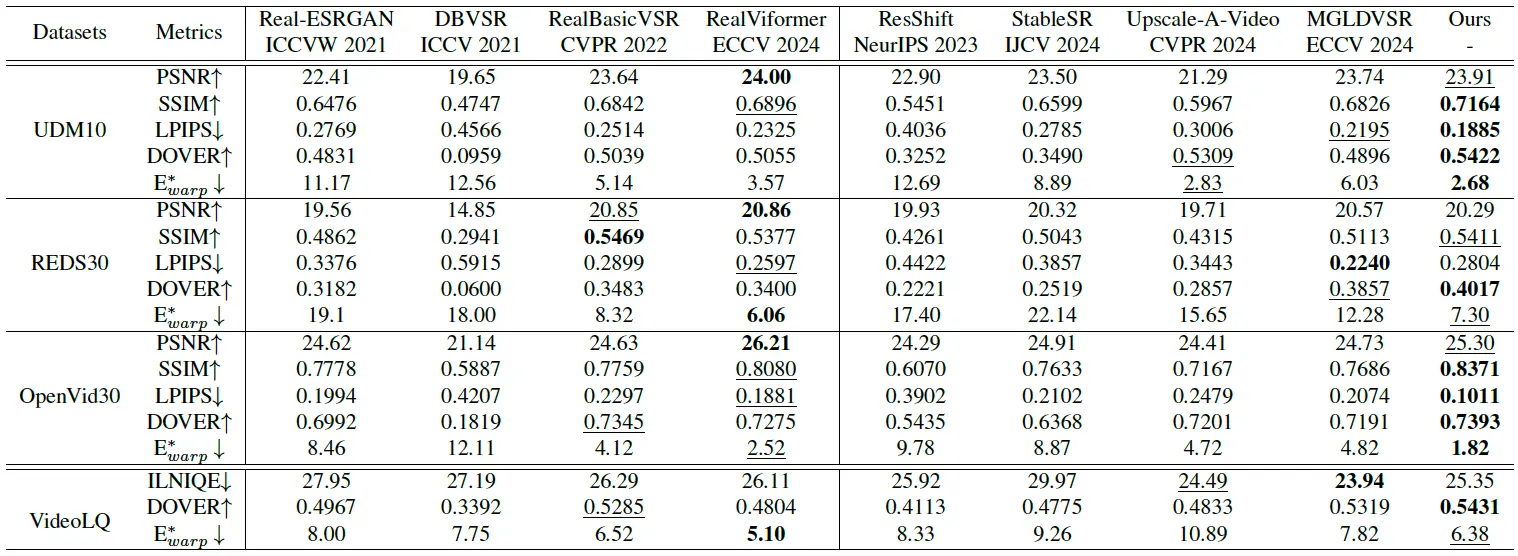
Benchmark Metrics
- STAR achieves higher values in most benchmark metrics for video quality and accuracy.
- Bold values in the comparison tables indicate that STAR has the highest performance among the options.
Visual Comparisons
-
Facial Details and Helmet
- Other upscalers struggle with consistency and sharpness, often resulting in warping or deformities around edges.
- STAR maintains sharpness and consistency, with no noticeable warping.
-
Car and Text Details
- Other upscalers cause the edges of the car and text in the lower right corner to warp over time.
- STAR keeps everything consistent and sharp, even during fast movements.
-
High-Action Movements
- Other upscalers fail to handle high-action movements smoothly, leading to noticeable inconsistencies.
- STAR upscales these movements seamlessly, maintaining sharpness and detail.
How to use STAR on Google Colab?
Step 1: Set Up Google Colab
- Open Google Colab.
- Create a new notebook or use an existing one.
- Ensure you are using a GPU runtime for faster processing:
- Go to Runtime > Change runtime type.
- Select GPU under Hardware accelerator.
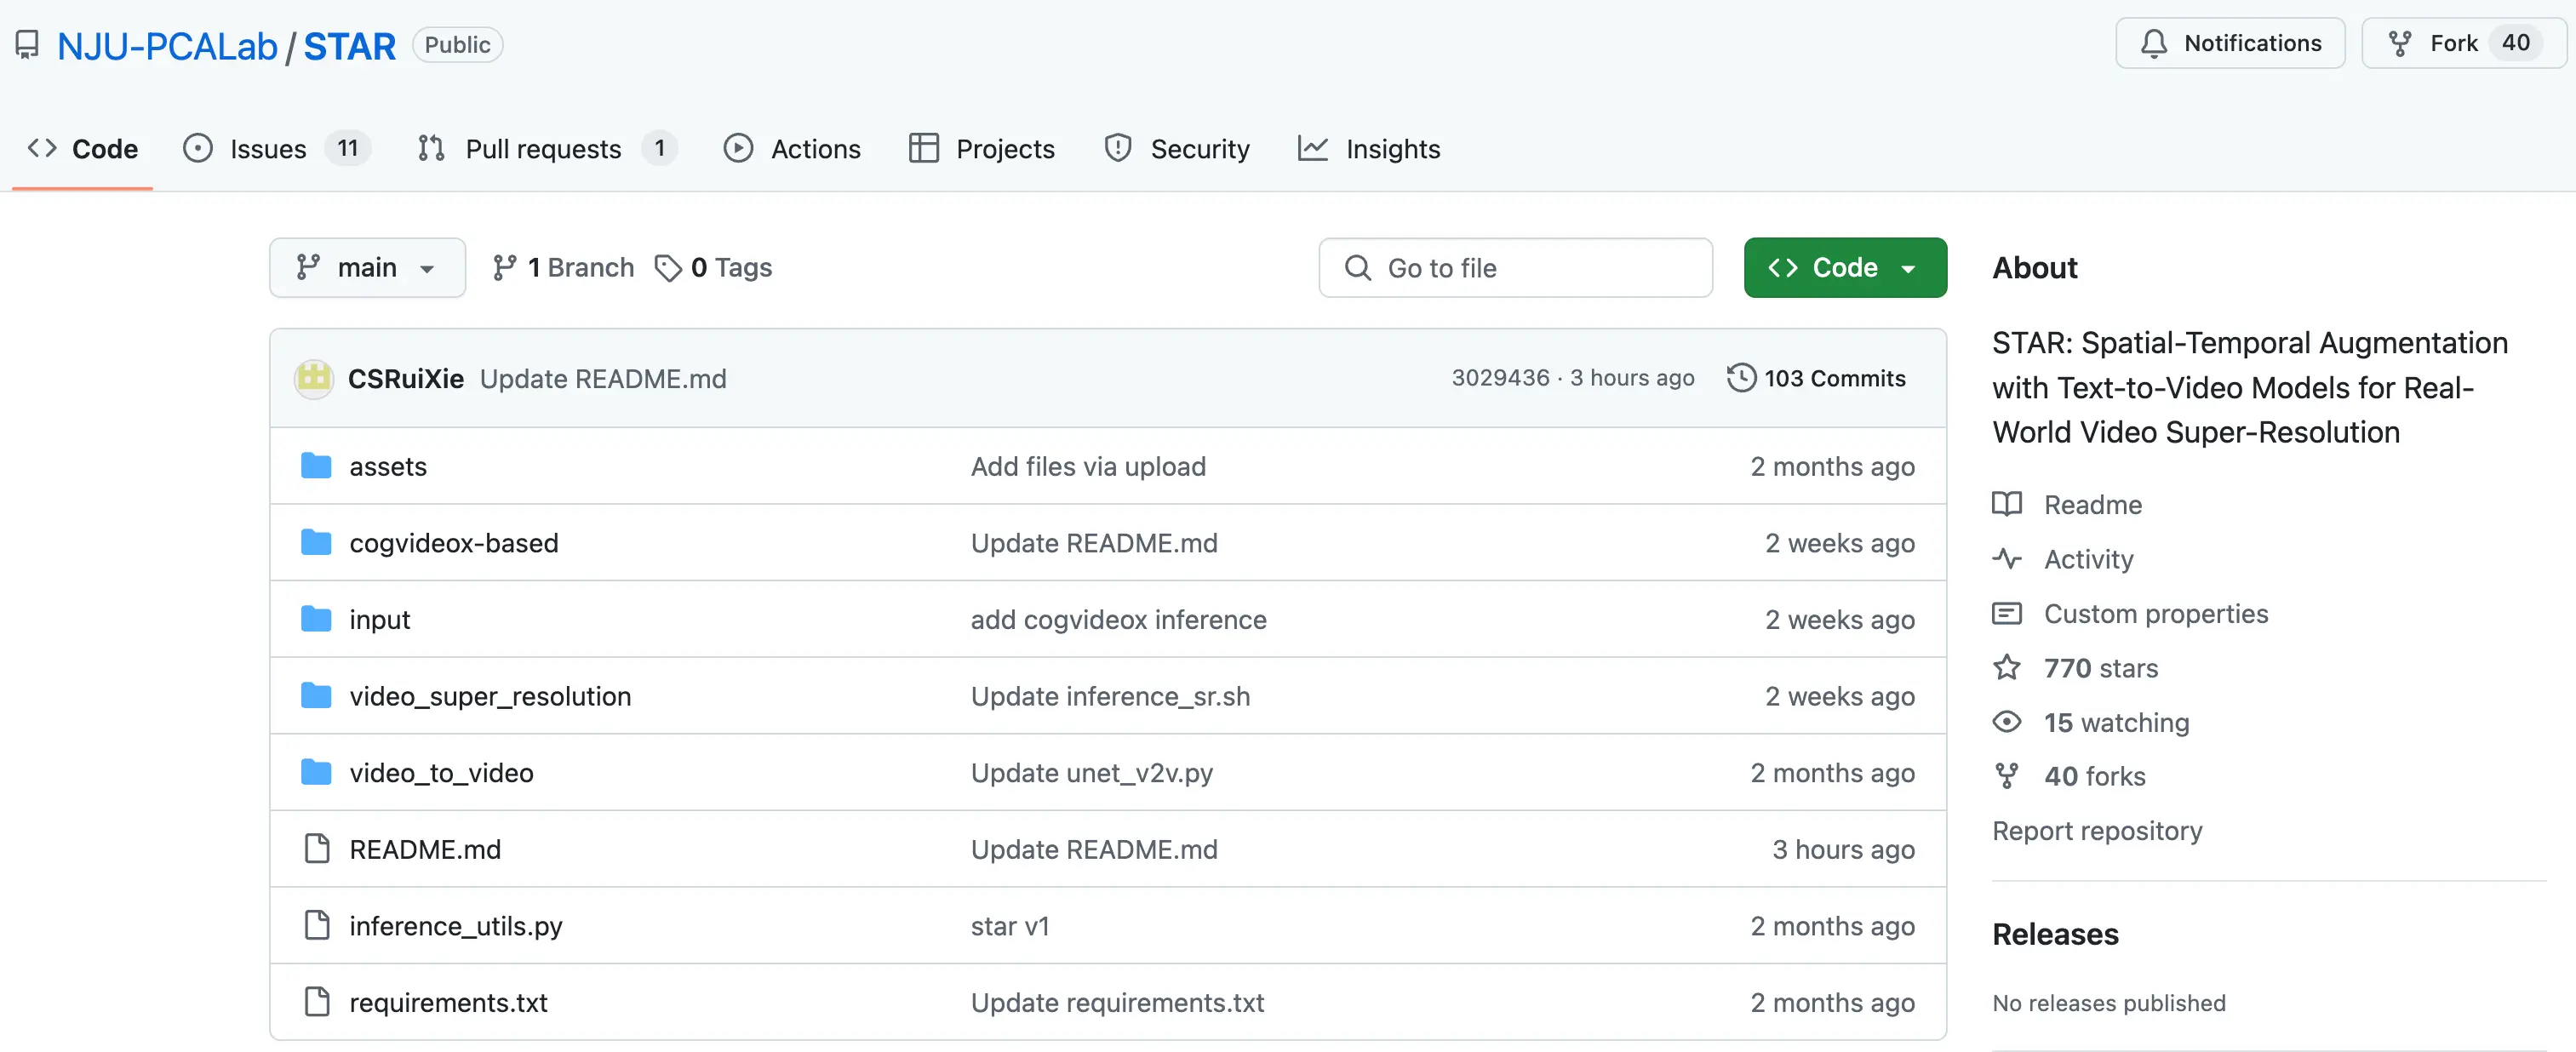
Step 2: Clone the STAR Repository
Run the following command to clone the STAR repository:
!git clone https://github.com/NJU-PCALab/STAR.git
%cd STAR
Step 3: Install Dependencies
Install the required dependencies using the requirements.txt file:
!pip install -r requirements.txtStep 4: Set Up Pretrained Weights
- Create a directory for pretrained weights:
%mkdir pretrained_weight - Download the pretrained weights (if available) and place them in the
pretrained_weightdirectory. You may need to check the repository for specific instructions on obtaining the weights.
Step 5: Modify the Script (if needed)
- Open the
inference_sr.shscript located invideo_super_resolution/scripts/. - Modify the script to specify:
- Input video path.
- Output video path.
- Desired resolution or scaling factor.
- Any other parameters as needed.
Step 6: Run Inference
Execute the inference script to perform video super-resolution:
!bash video_super_resolution/scripts/inference_sr.shStep 7: View Results
- After the script completes, the output video will be saved in the specified output directory.
- You can download the enhanced video from Google Colab by navigating to the output folder and using the file browser to download it.
Optional: Customize the Process
- Input Video: Replace the sample input video with your own video by uploading it to the appropriate directory.
- Parameters: Experiment with different parameters in the script to achieve the desired results.
- Text-to-Video Models: If the repository supports it, you can integrate text-to-video models for additional enhancements.
How STAR Works?
STAR’s architecture consists of several key components that work together to enhance video quality. Here’s a breakdown of how it operates:
1. VAE Encoders
- These encoders compress and reconstruct video data, ensuring the input is processed efficiently.
2. Text Encoder
- This component takes a text description of the video and converts it into data that the AI can use.
3. ControlNet
- ControlNet ensures that the newly generated video aligns with the original input, maintaining consistency.
4. Local Information Enhancement Module (LIEM)
- LIEM is the most critical component of STAR. It enhances local details and reduces errors, making the upscaled video sharper and more detailed.
Why STAR Stands Out?
STAR addresses two major challenges in video super-resolution:
- Artifacts from Complex Degradations: Real-world videos often suffer from artifacts due to compression or other degradations. STAR’s LIEM helps mitigate these issues.
- Fidelity Compromises: Powerful text-to-video models can sometimes compromise fidelity. STAR introduces a Dynamic Frequency (DF) Loss to reinforce fidelity by focusing on different frequency components across diffusion steps.
Key Innovations
- Local Information Enhancement Module (LIEM): Enriches local details and reduces artifacts.
- Dynamic Frequency (DF) Loss: Adaptively adjusts constraints on high- and low-frequency components, enhancing fidelity.
How to Use STAR
The best part about STAR is that it’s open-source, and the code is already available for anyone to use. Here’s how you can get started:
- Visit the GitHub Repository: Click the provided button to access the STAR GitHub page.
- Follow the Instructions: The repository includes detailed instructions on how to download and run STAR locally on your computer.
- Experiment with Your Videos: Use STAR to upscale your own videos and see the results for yourself.
Final Thoughts
STAR is an incredibly useful tool for anyone looking to enhance the quality of their videos. Whether you’re working with real-world footage or AI-generated content, STAR’s ability to upscale videos while maintaining sharpness and consistency is truly impressive.
Related Posts

3DTrajMaster: A Step-by-Step Guide to Video Motion Control
Browser Use is an AI-powered browser automation framework that lets AI agents control your browser to automate web tasks like scraping, form filling, and website interactions.
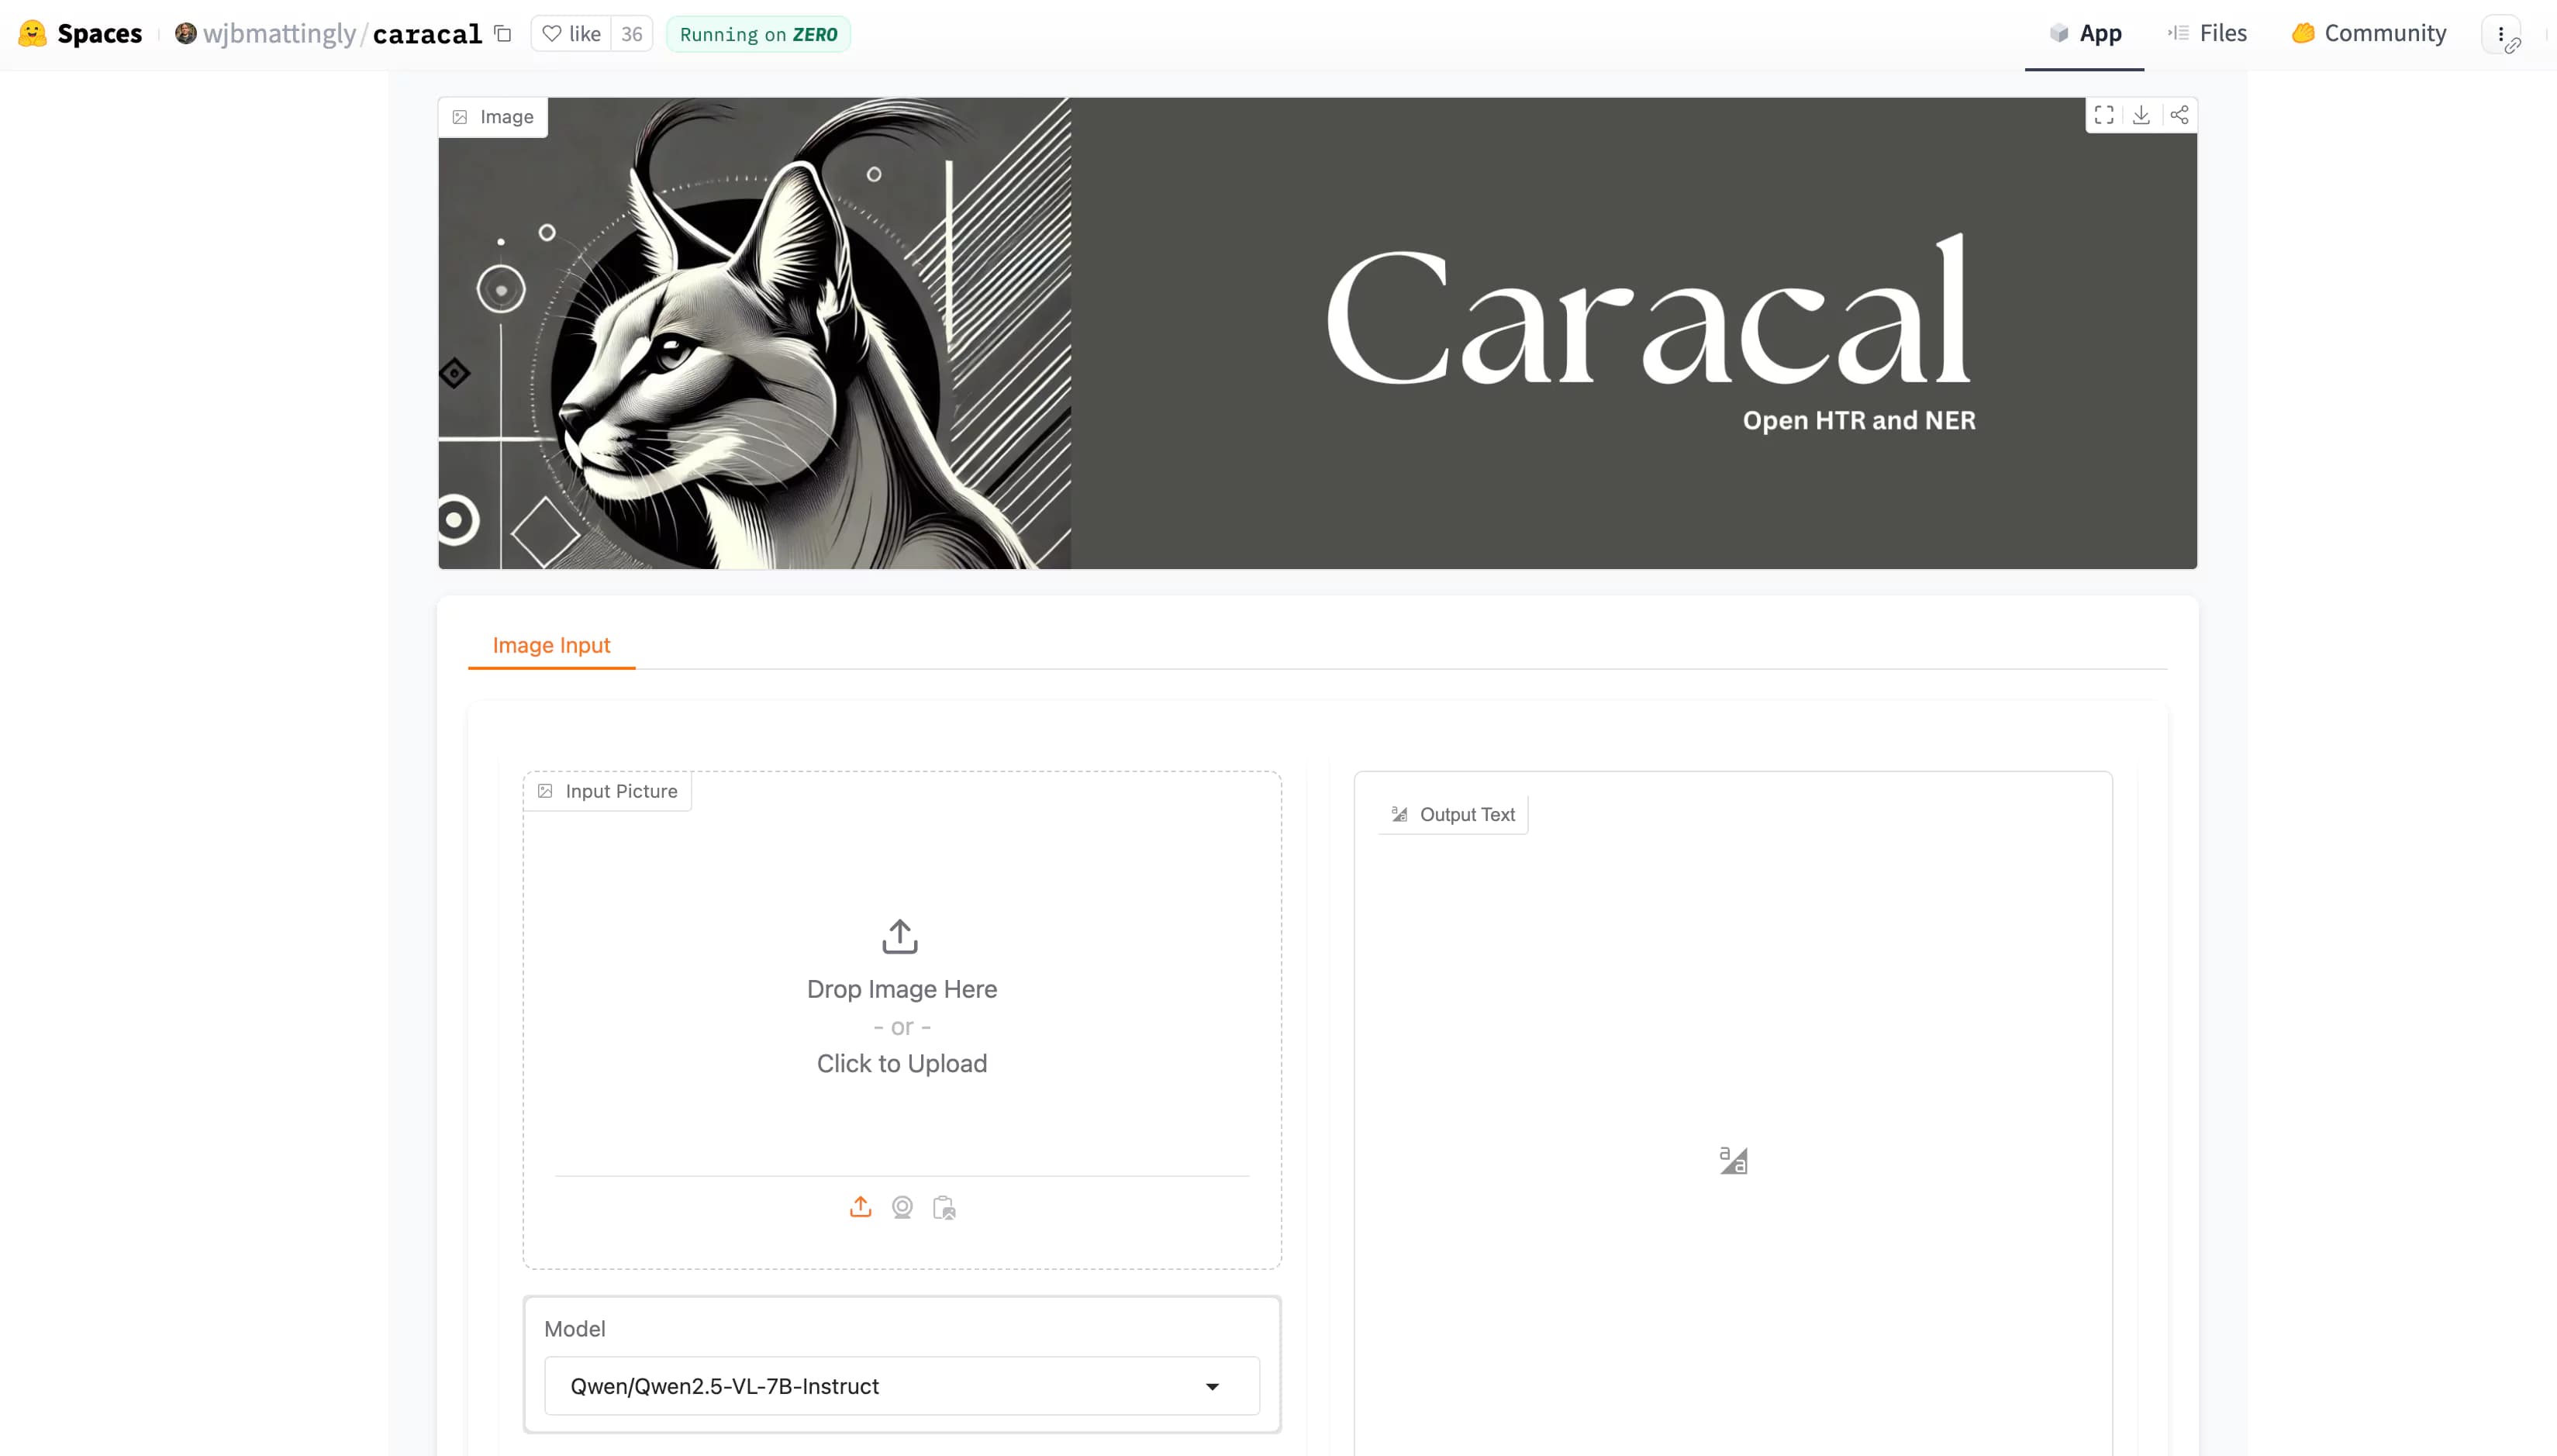
Caracal AI: Free Tool for Handwritten Text Recognition, Extract text from Images
Caracal is a text recognition project that has been widely cloned and fine-tuned by users for specific purposes. The project leverages advanced technology for text recognition tasks, as highlighted in the provided transcript snippet.

Browser-Use Free AI Agent: Now AI Can control your Web Browser
Browser Use is an AI-powered browser automation framework that lets AI agents control your browser to automate web tasks like scraping, form filling, and website interactions.