
Kokoro TTS WebUI Installation Locally, Google Colab: Step-by-Step

Table Of Content
- Step 1: Setting Up the Environment
- Choosing the Installation Folder
- Cloning the Repository
- Navigating to the Kokoro Folder
- Step 2: Creating a Virtual Environment
- Why Use a Virtual Environment?
- Creating the Virtual Environment
- Activating the Virtual Environment
- Step 3: Installing PyTorch
- Checking Your CUDA Version
- Installing the Correct PyTorch Version
- Step 4: Installing Required Packages
- Installing Dependencies
- Step 5: Downloading the Models
- Downloading the Models and Voice Packs
- Combining Voices
- Creating a Shell Script
- Step 6: Installing ISPNG (Windows Only)
- Downloading and Installing ISPNG
- Verifying the Installation
- Step 7: Running the Gradio App
- Running the App
- Creating a Batch File
- Step 8: Using the Kokoro TTS Interface
- Generating Audio
- Adjusting Settings
- Step 9: Running on Google Colab
- Step 1: Open Google Colab
- Step 2: Copy the Code from Hugging Face
- Step 3: Connect to a GPU
- Understanding the Code
- Part 1: Installing Dependencies
- Part 2: Building the Model
- Part 3: Voice Details
- Part 4: Generating Speech
- Complete Google Colab Code:
- 1️⃣ Install dependencies silently
- 2️⃣ Build the model and load the default voicepack
- 3️⃣ Call generate, which returns 24khz audio and the phonemes used
- Language is determined by the first letter of the VOICE_NAME:
- 🇺🇸 'a' => American English => en-us
- 🇬🇧 'b' => British English => en-gb
- 4️⃣ Display the 24khz audio and print the output phonemes
- Running the Code
- Step 1: Install Dependencies
- Step 2: Build the Model
- Step 3: Generate Speech
- Testing the Output
- Step 10: Using the API
- Accessing the API
- Important Links & Resources
- Conclusion
In this article, I’ll walk you through the process of installing Kokoro TTS on your local system, if you’re using Mac, Windows or Linux. I’ll also show you how to run it on Google Colab. The github repo used from Neural Falcon. Let’s dive into the installation process step by step.
Step 1: Setting Up the Environment
Choosing the Installation Folder
First, open the folder where you want to install Kokoro TTS. Once you’ve selected the folder, open a terminal by clicking on the file path, typing CMD, and hitting Enter. This will open a terminal in the selected folder.
Cloning the Repository
Next, copy the first command from the script, which is:
git clone https://github.com/NeuralFalconYT/Kokoro-82M-WebUI.gitPaste this command into the terminal and hit Enter. This will download all the files from the GitHub repository.
Navigating to the Kokoro Folder
After cloning the repository, copy the second command:
cd kokoro_82mPaste it into the terminal and hit Enter. This will take you inside the Kokoro folder.
Step 2: Creating a Virtual Environment
Why Use a Virtual Environment?
While you can skip this step, it’s highly recommended to create a virtual environment to avoid conflicts with other Python projects.
Creating the Virtual Environment
To create a virtual environment, paste the following command into the terminal:
python -m venv myEnvHit Enter, and the virtual environment will be created. You’ll see a folder named myEnv in your directory.
Activating the Virtual Environment
To activate the virtual environment, use the following command:
- For Windows:
myEnv\Scripts\activate - For Mac and Linux:
source myEnv/bin/activate
Once activated, you’ll see the virtual environment name in your terminal prompt.
Step 3: Installing PyTorch
Checking Your CUDA Version
Before installing PyTorch, you need to check your CUDA version. Run the following command:
nvidia-smiThis will display your CUDA version. For example, my CUDA version is 11.8.
Installing the Correct PyTorch Version
Visit the PyTorch installation page and select the appropriate CUDA version. For instance, if your CUDA version is 11.8, copy the corresponding PyTorch installation command.
Modify the command to remove unnecessary components like torchvision and torchaudio. For example:
pip install torch [CUDA link]Paste the modified command into the terminal and hit Enter. The installation may take some time.
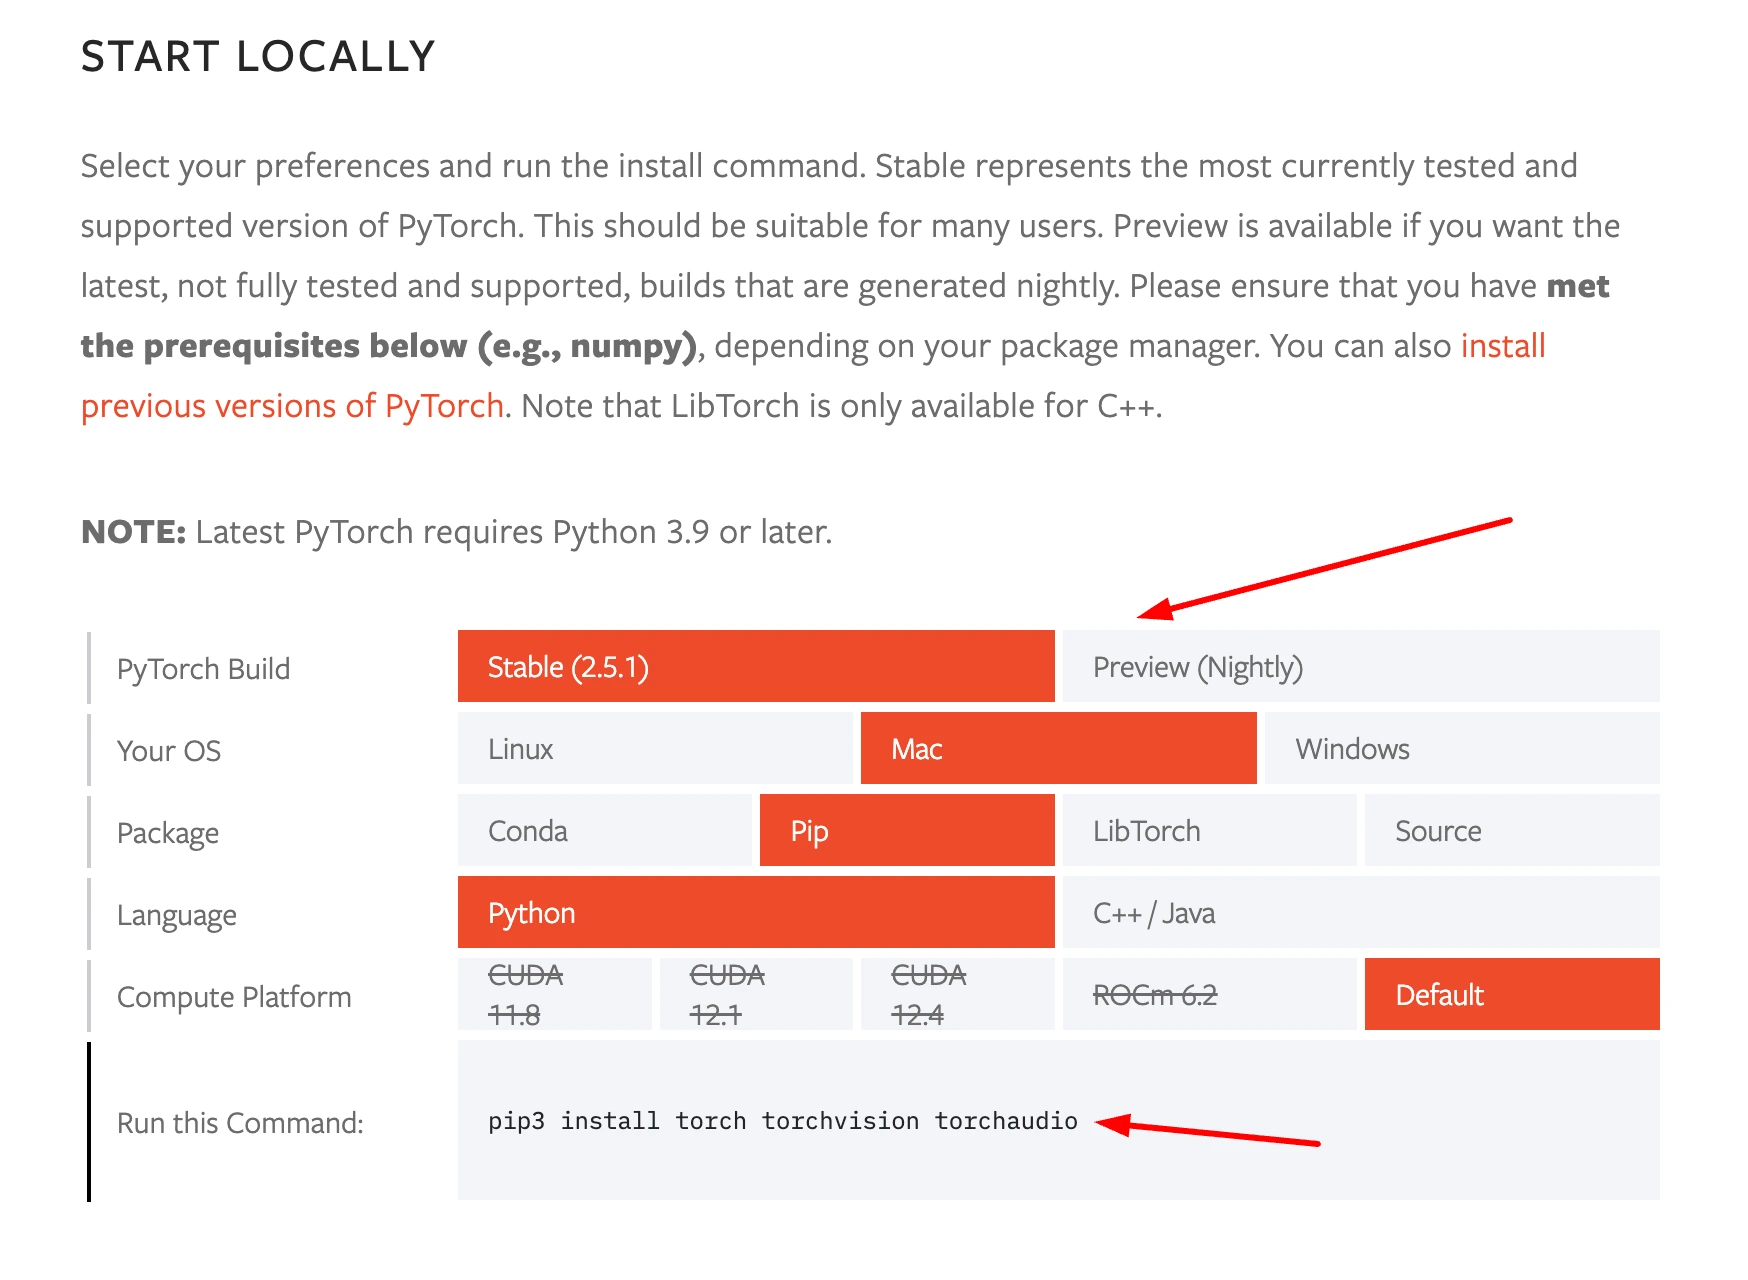
- For Mac:
pip install torch torchvision torchaudioStep 4: Installing Required Packages
Installing Dependencies
Once PyTorch is installed, you need to install the required packages. Use the following command:
pip install -r requirements.txtThis will install all the necessary dependencies. After the installation is complete, clear the terminal screen using:
clsStep 5: Downloading the Models
Downloading the Models and Voice Packs
To download the models and voice packs, run the following command:
python download_model.pyThis script will download the original model (k9.pth) and a quantized version, which is faster but slightly reduces output quality. Additionally, it will download 12 default voice packs.
Combining Voices
I’ve added a feature in the download_model.py script that allows you to combine two voices to create a new one. For example, you can mix Bella and Sara to create a unique voice. If you prefer to stick with the default 12 voices, you can comment out the relevant line in the script.
import torch
bella = torch.load('voices/af_bella.pt', weights_only=True)
sarah = torch.load('voices/af_sarah.pt', weights_only=True)
af = torch.mean(torch.stack([bella, sarah]), dim=0)
assert torch.equal(af, torch.load('voices/af.pt', weights_only=True))
Creating a Shell Script
To simplify the process, you can create a shell script (run_app.sh) to automate the steps. Here’s how:
- Create a new file named
run_app.shin thekokoro_82mfolder. - Add the following lines to the file:
#!/bin/bash
source myEnv/bin/activate
python app.py- Save the file and make it executable using:
chmod +x run_app.sh- Run the script using:
./run_app.shStep 6: Installing ISPNG (Windows Only)
Downloading and Installing ISPNG
If you’re using Windows, you’ll need to install ISPNG. Follow these steps:
- Click on the provided link to download the ISPNG MSI file.
- Open the downloaded file and follow the installation prompts:
- Accept the license agreement.
- Click “Next” until the installation begins.
- Click “Yes” to confirm and “Finish” to complete the installation.
Verifying the Installation
To verify the installation, navigate to:
C:\Program Files\ISPNGEnsure that the ISPNG folder is present.
Step 7: Running the Gradio App
Running the App
To run the Gradio app, ensure you’re inside the virtual environment. Use the following command:
python app.py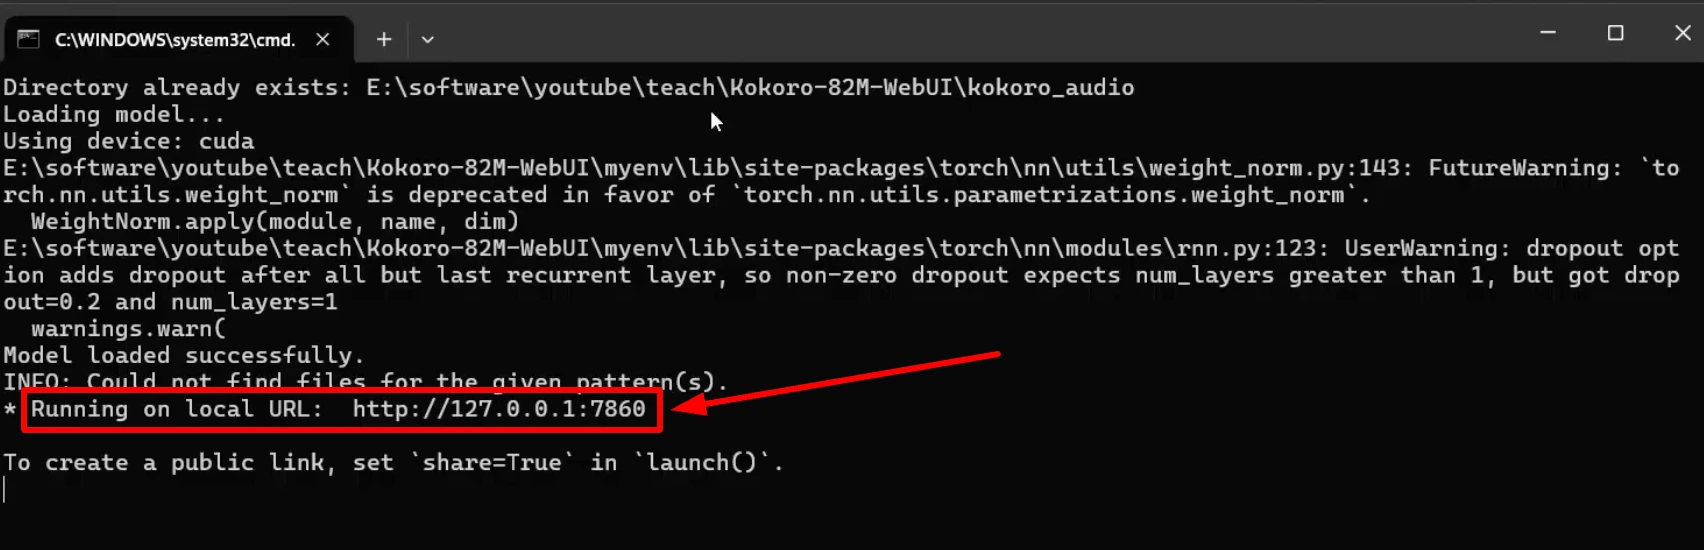
This will load the model and provide a Gradio link. Click on the link to open the interface in your browser.
Creating a Batch File
To simplify the process, I’ve created a batch file (run_app.bat). Double-clicking this file will automatically set up the virtual environment and run the Gradio app.
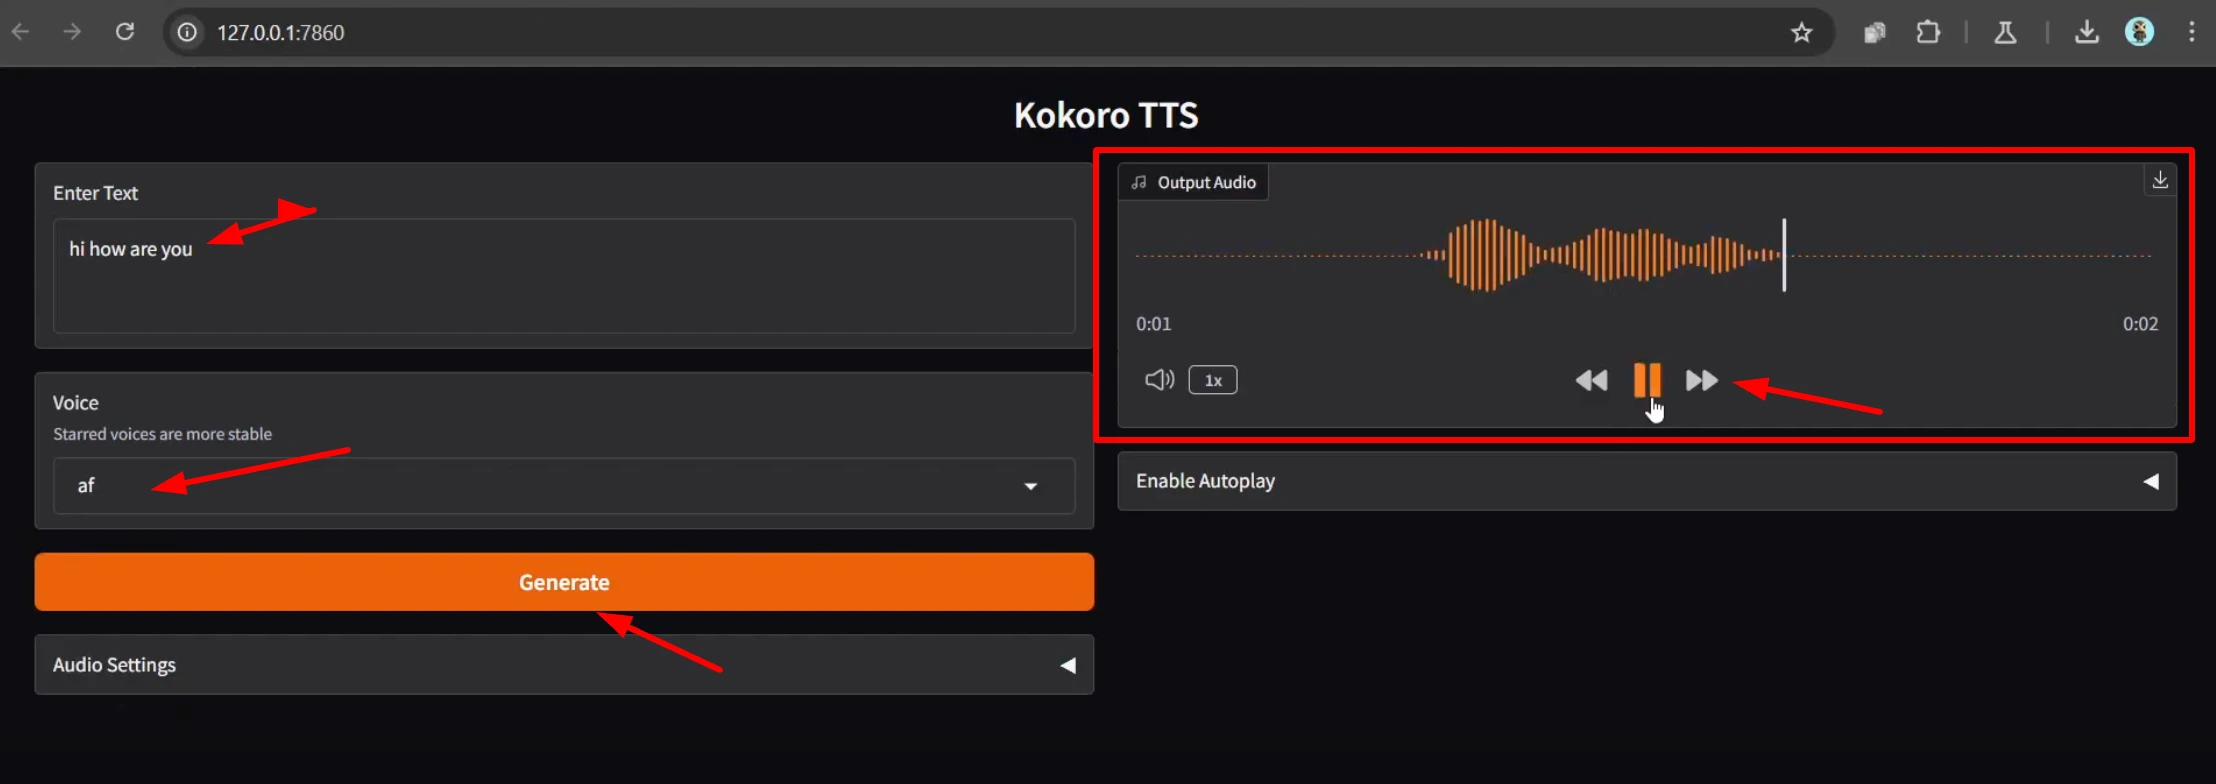
Step 8: Using the Kokoro TTS Interface
Generating Audio
Once the interface is open, you can start generating audio. Here’s how:
- Enter your text in the input box.
- Select a voice from the dropdown menu. The first 12 options are the default voices, while the rest are combinations of these voices.
- Click “Generate” to create the audio.
Adjusting Settings
You can customize the output using the following options:
- Model Selection: Choose between the original model and the quantized version.
- Autoplay: Enable or disable autoplay for the generated audio.
- Remove Silences: Remove silences longer than 0.05 seconds.
- Speed: Adjust the playback speed using a slider or by entering a value.
- Trim: Trim silences at the beginning and end of the audio.
- Pad Between: Add silence between audio segments for large texts.
Step 9: Running on Google Colab
Step 1: Open Google Colab
First, open Google Colab and create a new notebook. You can do this by visiting Google Colab.
Step 2: Copy the Code from Hugging Face
Next, go to the Hugging Face repository for Kokoro TTS. You’ll find a piece of code that can be run in a single cell on Google Colab. This makes the setup process incredibly straightforward.
Copy the following code:
!git lfs install
!git clone https://huggingface.co/hexgrad/Kokoro-82M
%cd kokoro-82m
!pip install -r requirements.txt
Paste this code into a single cell in your Google Colab notebook.
Step 3: Connect to a GPU
To ensure optimal performance, connect your notebook to a T4 GPU. Here’s how:
- Click on Runtime in the top menu.
- Select Change runtime type.
- Choose T4 GPU from the hardware accelerator dropdown.
- Save the settings and click Connect.
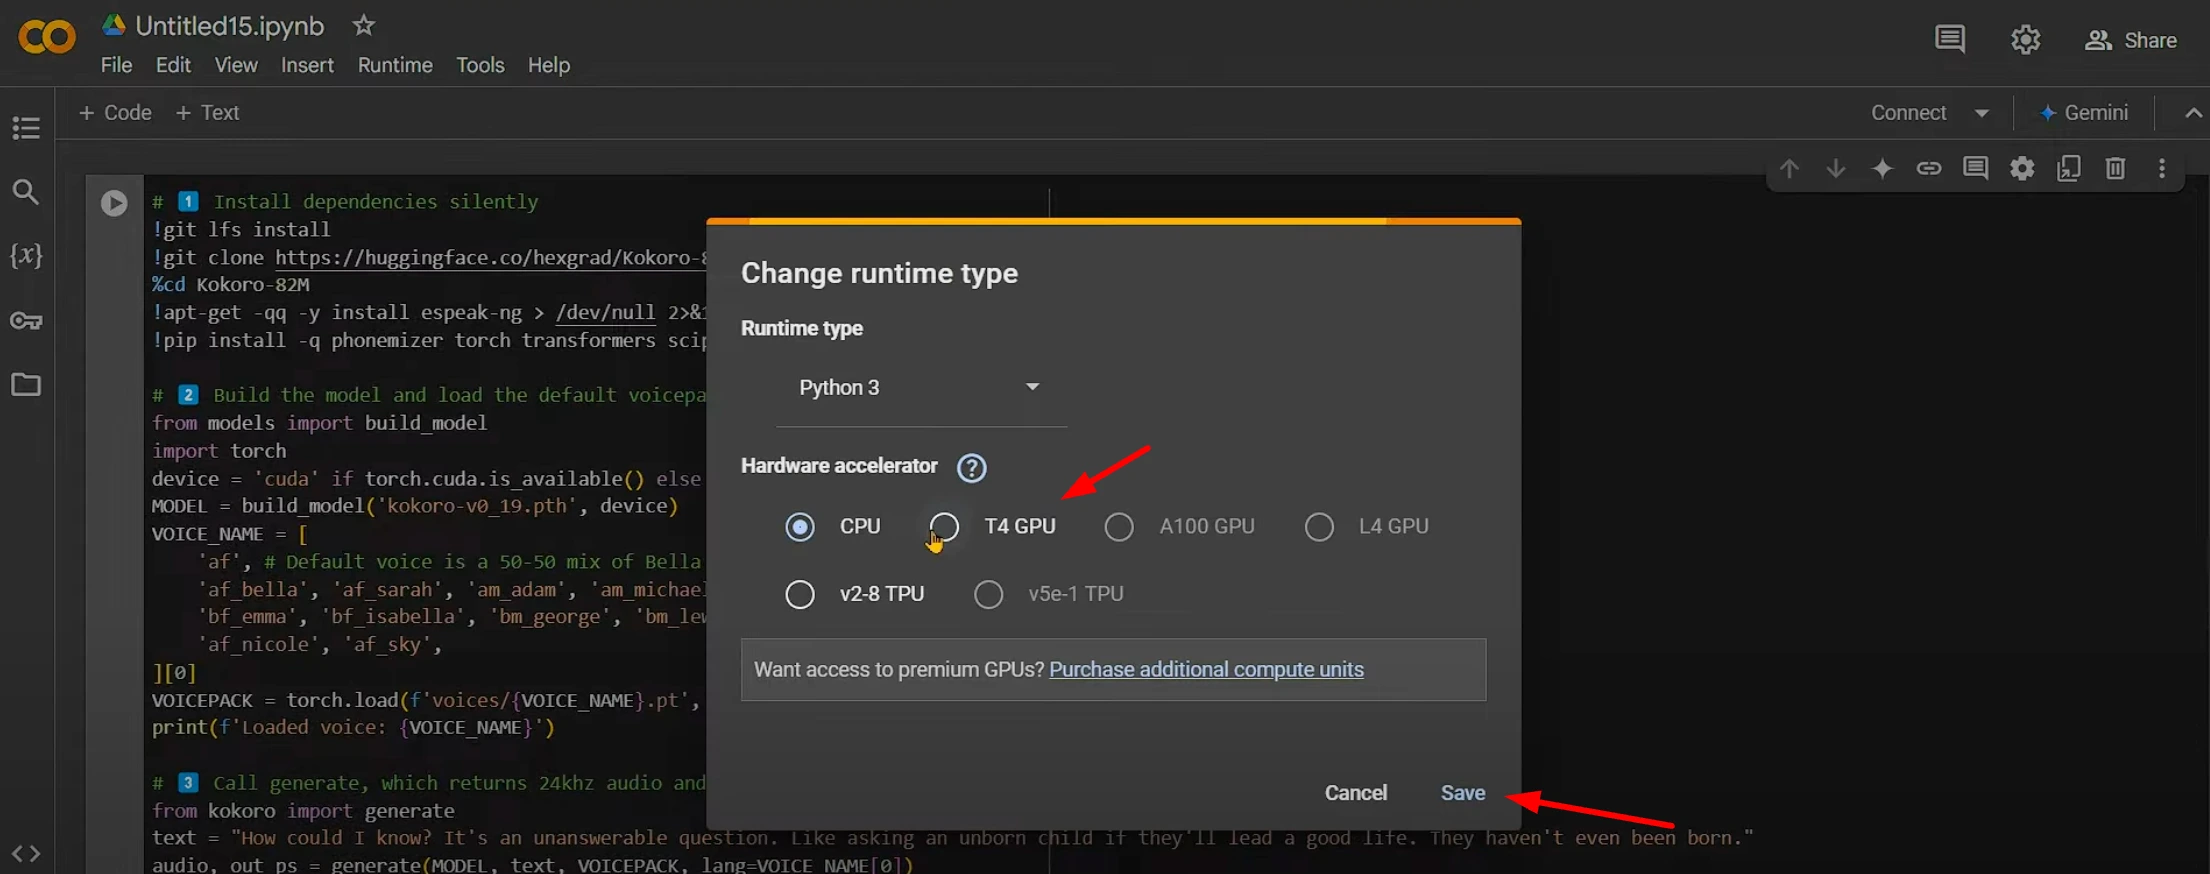
Once connected, you’re ready to run the code.
Understanding the Code
Let’s break down the code to understand what each part does.
Part 1: Installing Dependencies
The first part of the code installs the necessary dependencies:
- Git LFS: A scheme for handling large file systems.
- Cloning the Repository: This downloads the Kokoro TTS model from Hugging Face.
- Changing Directory: Moves you into the cloned repository.
- Installing Requirements: Installs the required Python packages.
Part 2: Building the Model
The next part of the code builds the model:
from models import build_model
import torch

device = 'cuda' if torch.cuda.is_available() else 'cpu'
model_name = 'kokoro_v0.19.pth'
model = build_model(model_name).to(device)
Here’s what’s happening:
- Importing Modules: The
build_modelfunction is imported from themodelsmodule. - Setting Device: The code checks if a GPU (CUDA) is available. If not, it defaults to the CPU.
- Loading the Model: The model is built and loaded onto the selected device.
Part 3: Voice Details
Kokoro TTS comes with 10 different voices. By default, it uses a 50/50 mix of two voices named Bella and Sarah.
voice_pack = torch.load('voice_pack.pt').to(device)
print(f"Selected Voice: {voice_pack['name']}")
This part loads the voice pack and prints the name of the selected voice.
Part 4: Generating Speech
The final part of the code generates the speech:
from kokoro import generate

text = "This is the text you want to convert to speech."
audio = generate(model, text, voice_pack, language='en', voice_name='zero')
Here’s a breakdown:
- Importing Generate Function: The
generatefunction is imported from thekokoromodule. - Defining Text: Replace the placeholder text with the text you want to convert to speech.
- Generating Audio: The
generatefunction takes the model, text, voice pack, language, and voice name as inputs to produce the audio.
Complete Google Colab Code:
# 1️⃣ Install dependencies silently
!git lfs install
!git clone https://huggingface.co/hexgrad/Kokoro-82M
%cd Kokoro-82M
!apt-get -qq -y install espeak-ng > /dev/null 2>&1
!pip install -q phonemizer torch transformers scipy munch

# 2️⃣ Build the model and load the default voicepack
from models import build_model
import torch
device = 'cuda' if torch.cuda.is_available() else 'cpu'
MODEL = build_model('kokoro-v0_19.pth', device)
VOICE_NAME = [
    'af', # Default voice is a 50-50 mix of Bella & Sarah
    'af_bella', 'af_sarah', 'am_adam', 'am_michael',
    'bf_emma', 'bf_isabella', 'bm_george', 'bm_lewis',
    'af_nicole', 'af_sky',
][0]
VOICEPACK = torch.load(f'voices/{VOICE_NAME}.pt', weights_only=True).to(device)
print(f'Loaded voice: {VOICE_NAME}')

# 3️⃣ Call generate, which returns 24khz audio and the phonemes used
from kokoro import generate
text = "How could I know? It's an unanswerable question. Like asking an unborn child if they'll lead a good life. They haven't even been born."
audio, out_ps = generate(MODEL, text, VOICEPACK, lang=VOICE_NAME[0])
# Language is determined by the first letter of the VOICE_NAME:
# 🇺🇸 'a' => American English => en-us
# 🇬🇧 'b' => British English => en-gb

# 4️⃣ Display the 24khz audio and print the output phonemes
from IPython.display import display, Audio
display(Audio(data=audio, rate=24000, autoplay=True))
print(out_ps)
Running the Code
Step 1: Install Dependencies
Run the first part of the code to install dependencies and set up the environment. This may take a few minutes.
Step 2: Build the Model
Once the dependencies are installed, run the second part of the code to build the model.
Step 3: Generate Speech
Finally, run the third part of the code to generate speech. You’ll see the output displayed as a 24 kHz audio file.
Testing the Output
After running the code, you’ll hear the generated speech.
You can listen to a sample output here:
The quality of the output is impressive, especially considering the model’s compact size.
Step 10: Using the API
Accessing the API
If you want to use Kokoro TTS in your projects, you can access the API. Here’s how:
- Open the Gradio app and scroll down to the “API” section.
- Copy the provided code and integrate it into your project.
- Use the API to generate audio by passing the text, voice name, and other parameters.
Important Links & Resources
| Resource | URL | Description |
|---|---|---|
| Official Hugging Face Model | hexgrad/Kokoro-82M | The official Kokoro TTS model repository with model files and documentation |
| Hugging Face Space | Kokoro-TTS | Interactive demo space to test Kokoro TTS directly in browser |
| Modified WebUI Repository | Kokoro-82M-WebUI | Neural Falcon's modified version with Gradio web interface |
| Google Colab | Kokoro TTS Colab | Run Kokoro TTS directly in Google Colab without local installation |
Conclusion
You’ve successfully installed and run Kokoro TTS on your local system and Google Colab. I’ve also shown you how to use the API for integration into other projects. All credit goes to the Kokoro official Hugging Face Model Hub and the Kokoro TTS space.
Related Posts

3DTrajMaster: A Step-by-Step Guide to Video Motion Control
Browser Use is an AI-powered browser automation framework that lets AI agents control your browser to automate web tasks like scraping, form filling, and website interactions.
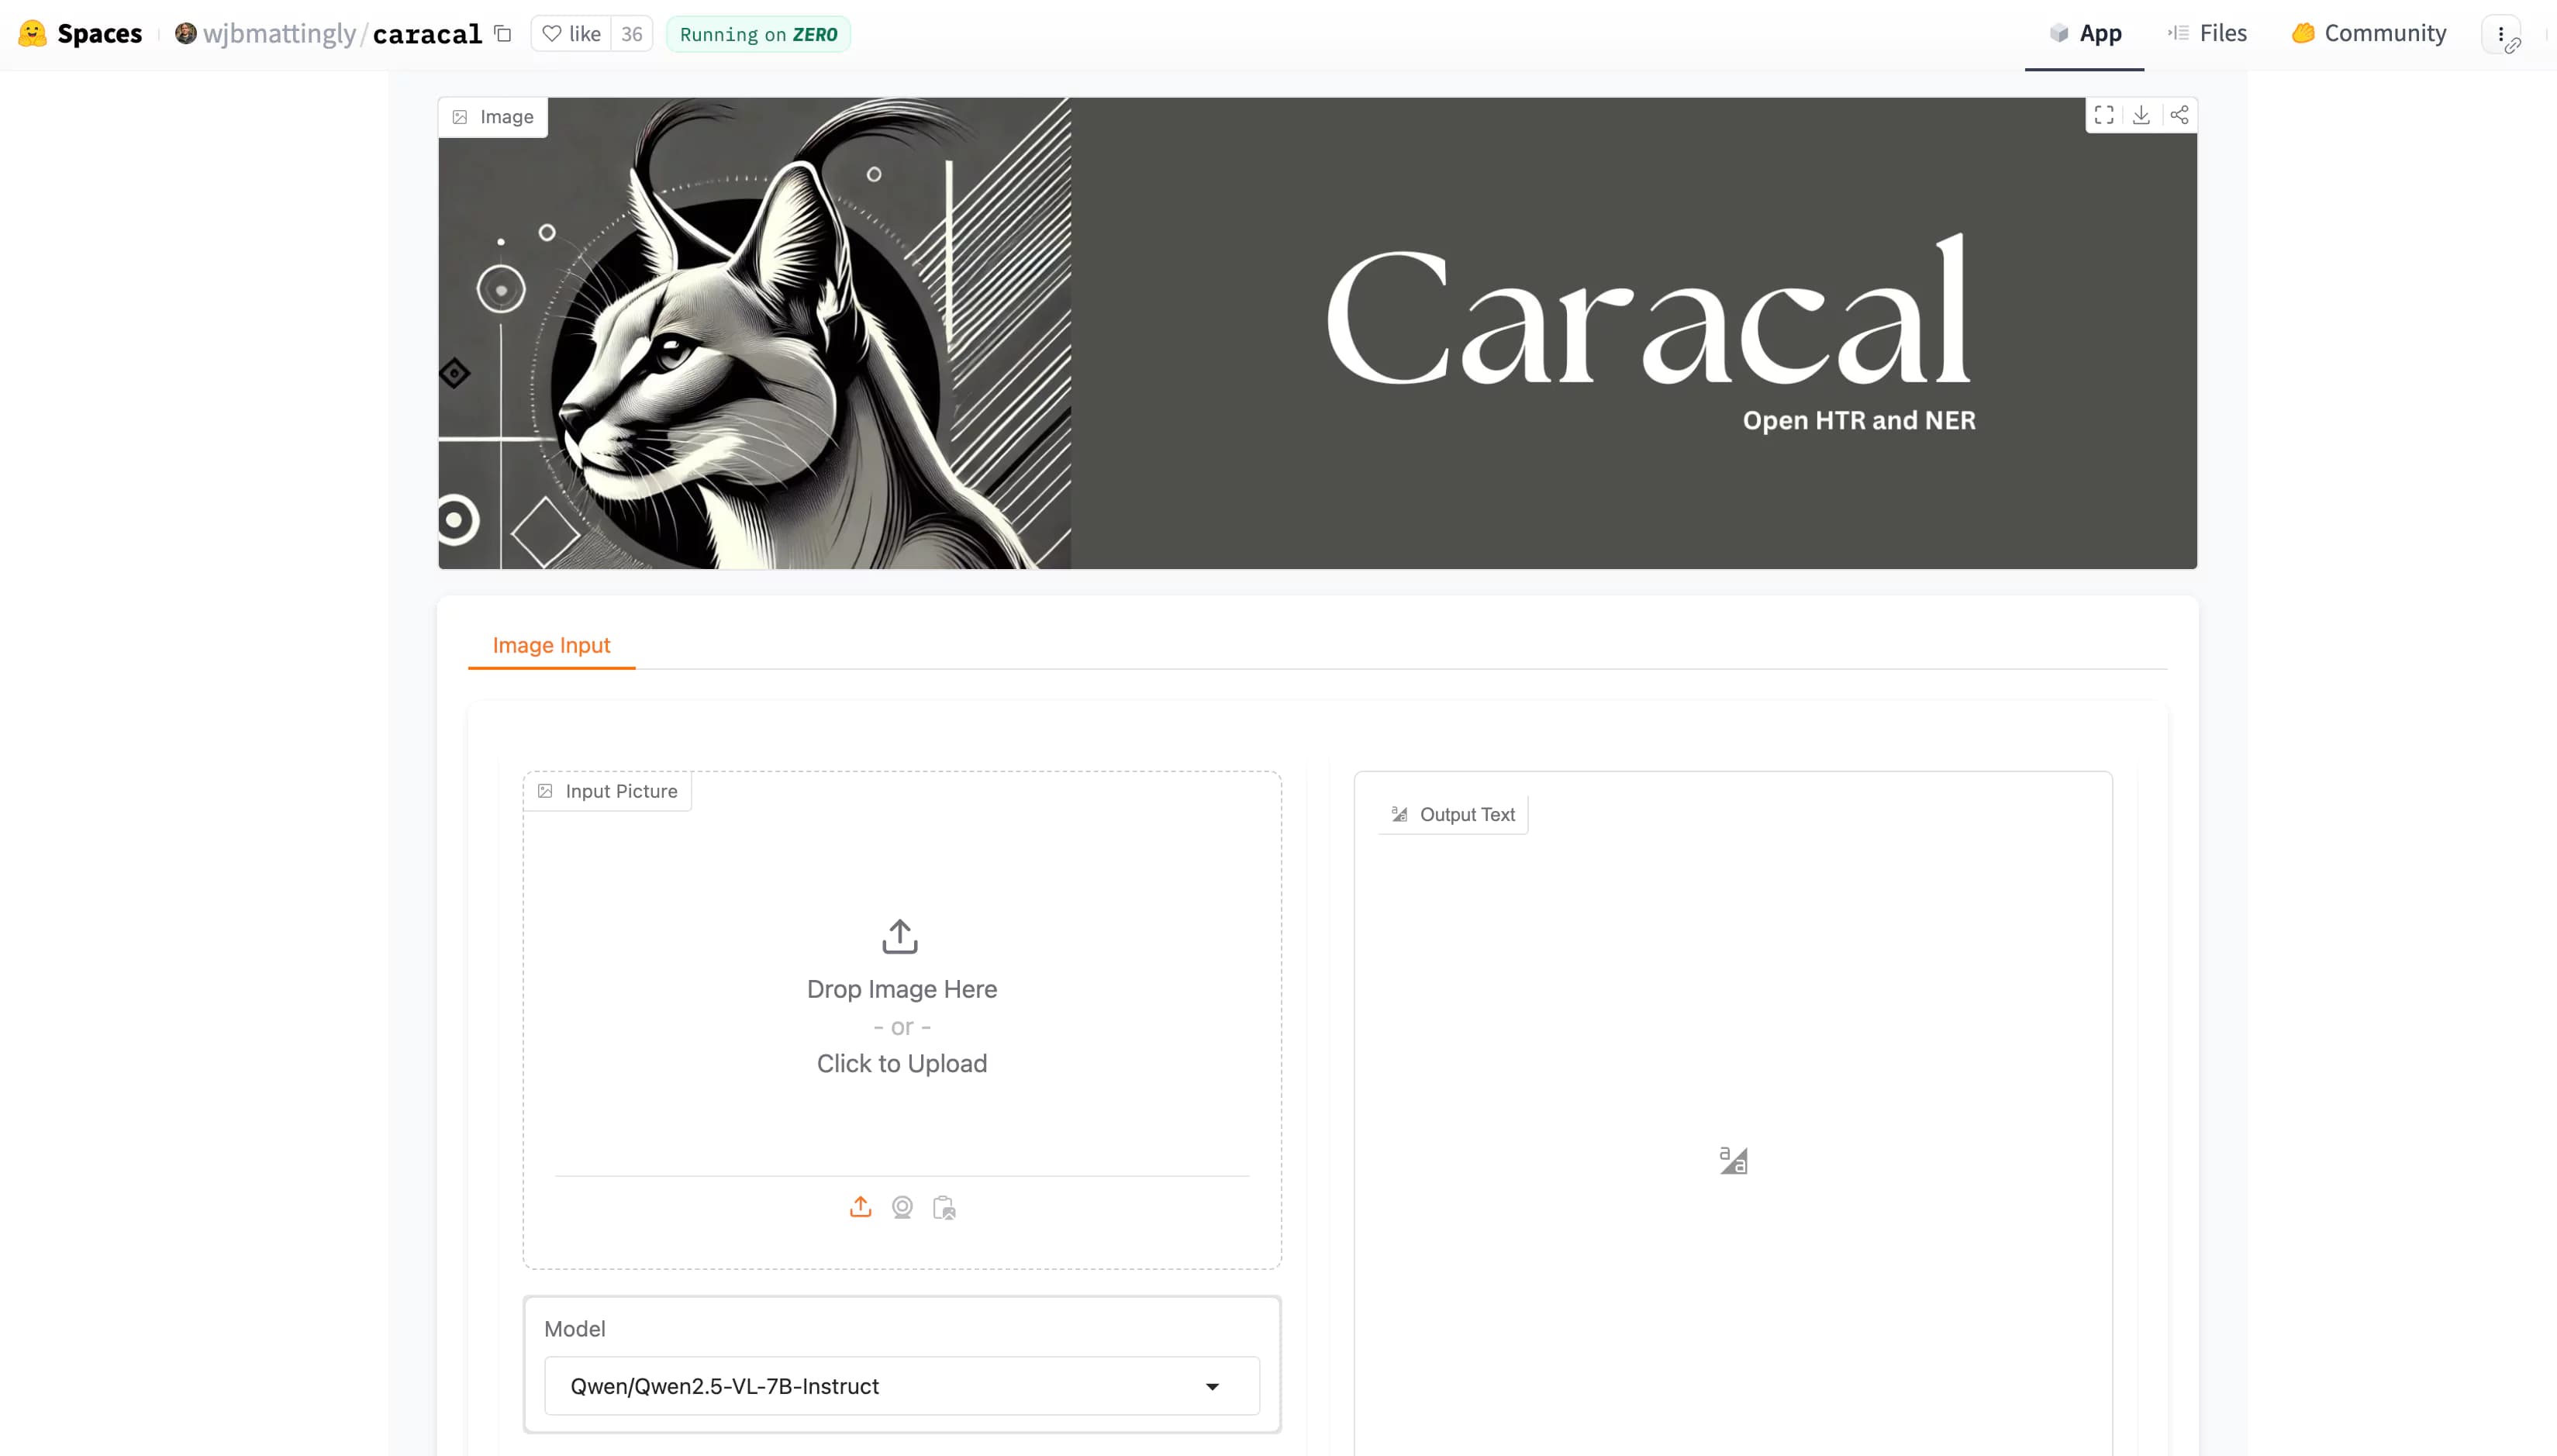
Caracal AI: Free Tool for Handwritten Text Recognition, Extract text from Images
Caracal is a text recognition project that has been widely cloned and fine-tuned by users for specific purposes. The project leverages advanced technology for text recognition tasks, as highlighted in the provided transcript snippet.

Browser-Use Free AI Agent: Now AI Can control your Web Browser
Browser Use is an AI-powered browser automation framework that lets AI agents control your browser to automate web tasks like scraping, form filling, and website interactions.